Whilst we were at Tactica, Mamalute had bought the Muskets and Tomahawks rule set and so I suggested that he might be interested in playing these at the Shed one night. A date was agreed and along with promised delivered Pizza the game was on.
I spent the weekend considering the scenario and pulled together some reference sheets. Given there was only four of us I could actually play.
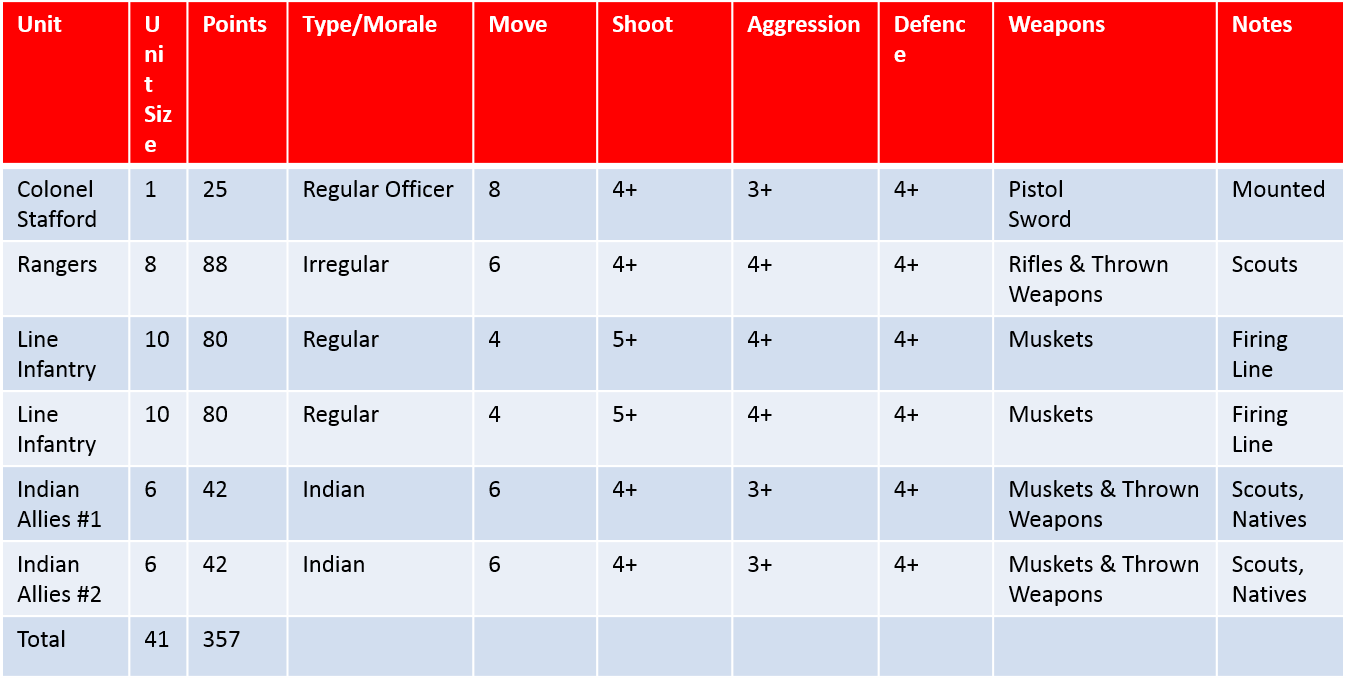
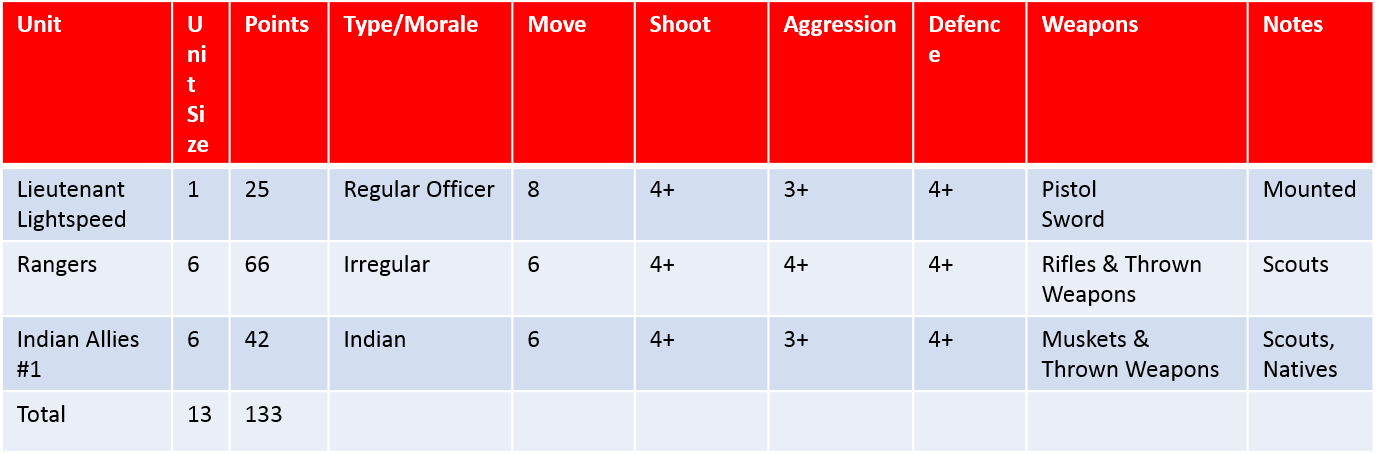
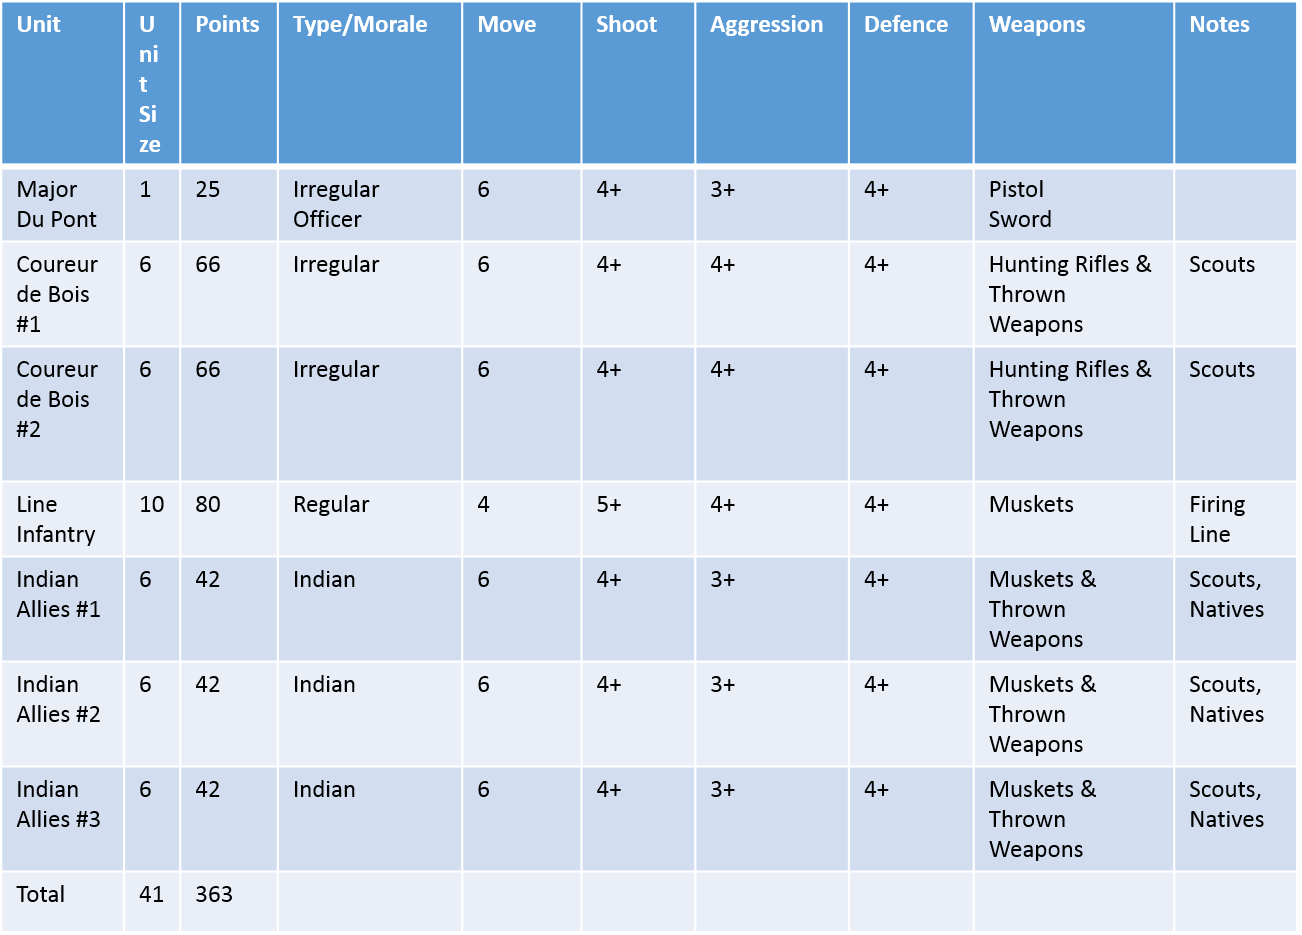
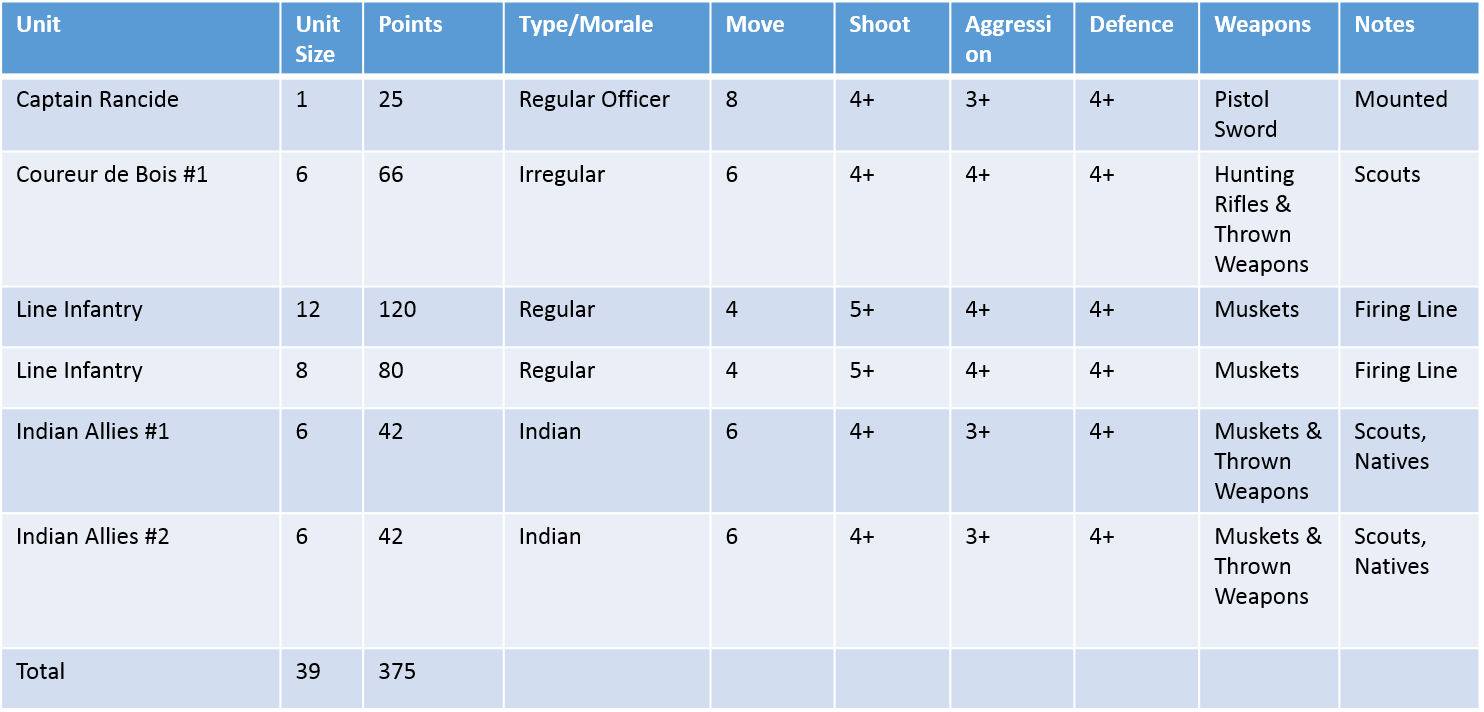
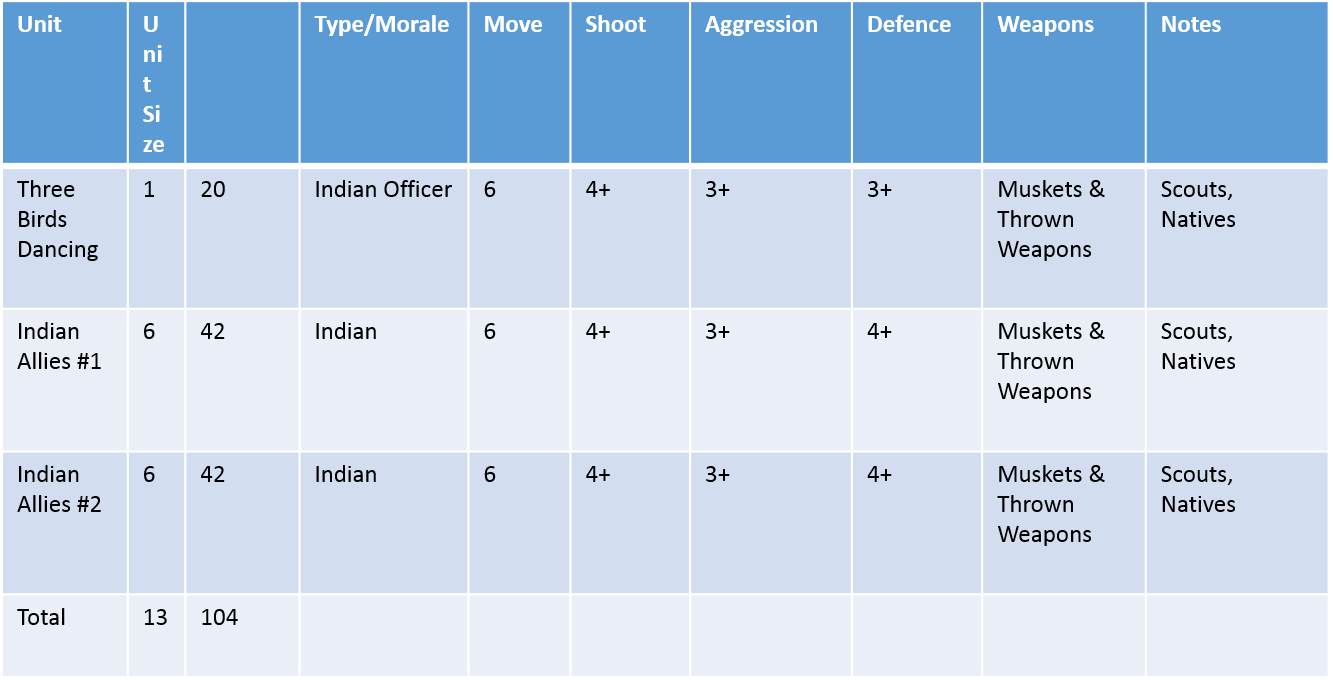
The following pictures are the orders of battle set out for the game. If anybody wants these in a pdf format please drop me a line. I'd be happy to share.
With the forces assembled - pretty much all my FIW figures - Battle ensued...
Orders of Battle
The Battle for Hatchet Creek – British Forces Information & Background
Over the last couple of years British settlers have established a small but thriving community in the region known as Hatchet Creek.
Fur
trading with local natives have
established this village on the map as a primary source of beaver pelts for the
ladies in the colonies.
Two
weeks ago the village received unwelcome news from the garrison commander at
Fort St James.
In
this message the inhabitants of
Hatchet Creek were warned that the local Indians were now in dialogue and
trading with the French further upstream.
This
perhaps explains why no pelts have
been recently delivered.
The
garrison commander – Colonel Stafford, being a wise old bird decided to bolster
the villages meagre defence with the construction of a block house and the
placement of
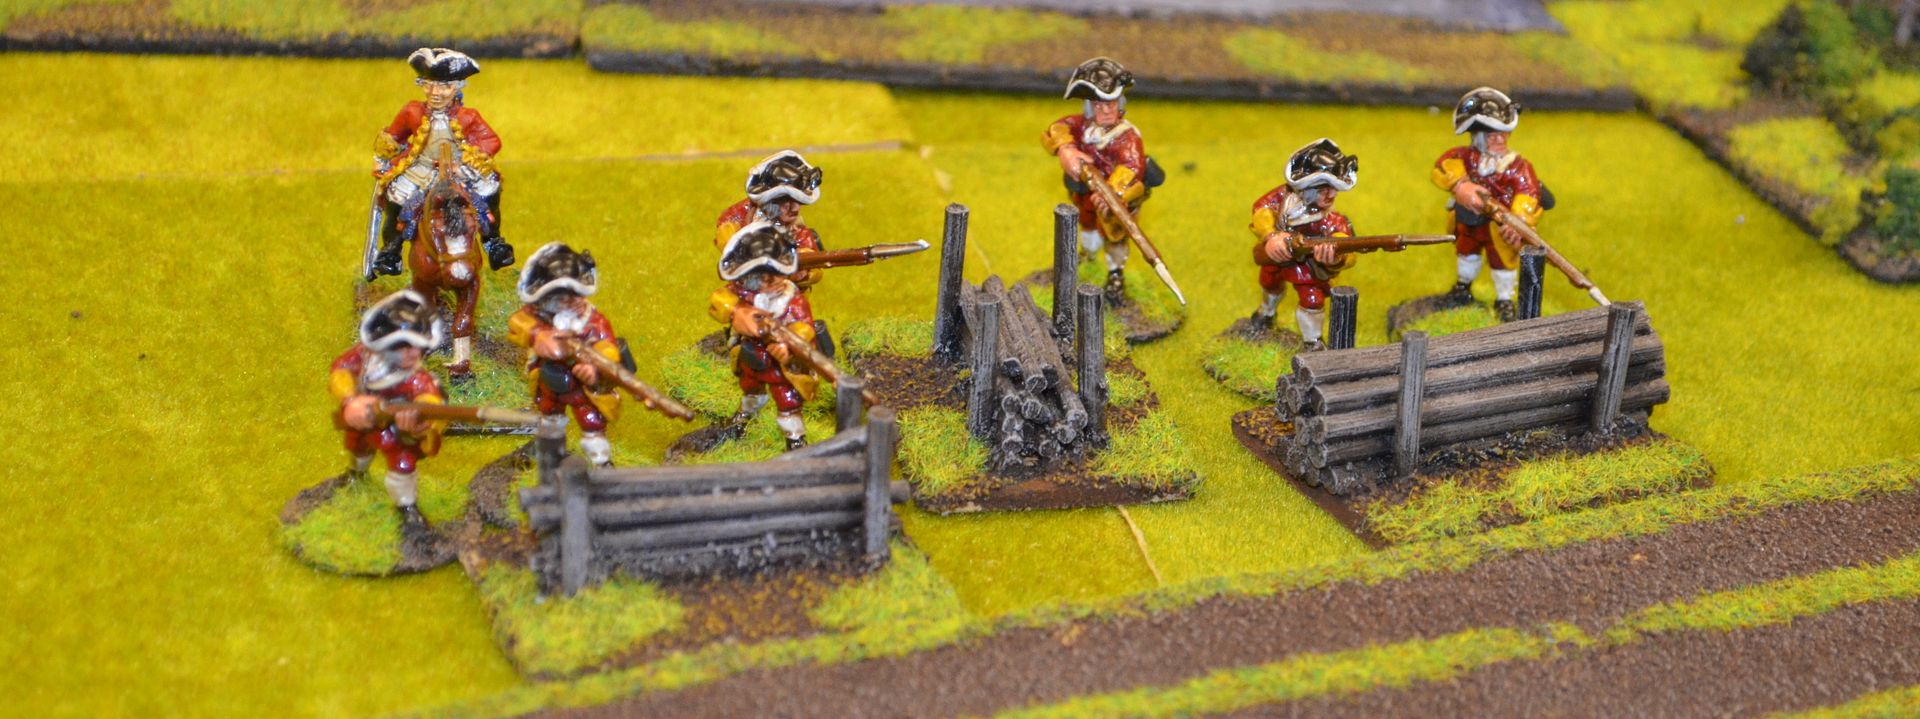
units of crack Rangers and Redcoats.
Last
night a friendly native arrived at the village in a rather poor state, he’d
been shot and had lost a great deal of blood. Before he passed on to the happy
hunting ground he mentioned that a sizeable force of French troops and Indians
were approaching Hatchet Creek with the Intent to destroy the settlement.
A
rider has been sent to Fort St James in the hope that a relief force can
mustered and despatched to the villager’s aid.
Your
defence forces are on the table – these can be placed in the buildings or
blockhouse.
The
main relief force will enter on the bridge from turn 1
A
secondary relief force will enter the board from the southern road on turn 3
Objectives
– ensure that more than 4% of the buildings in Hatchet Creek are undamaged
Notes:
The Big River may not be crossed other than at the bridge, the smaller rivers
may be crossed at -half speed, other
than at the ford.
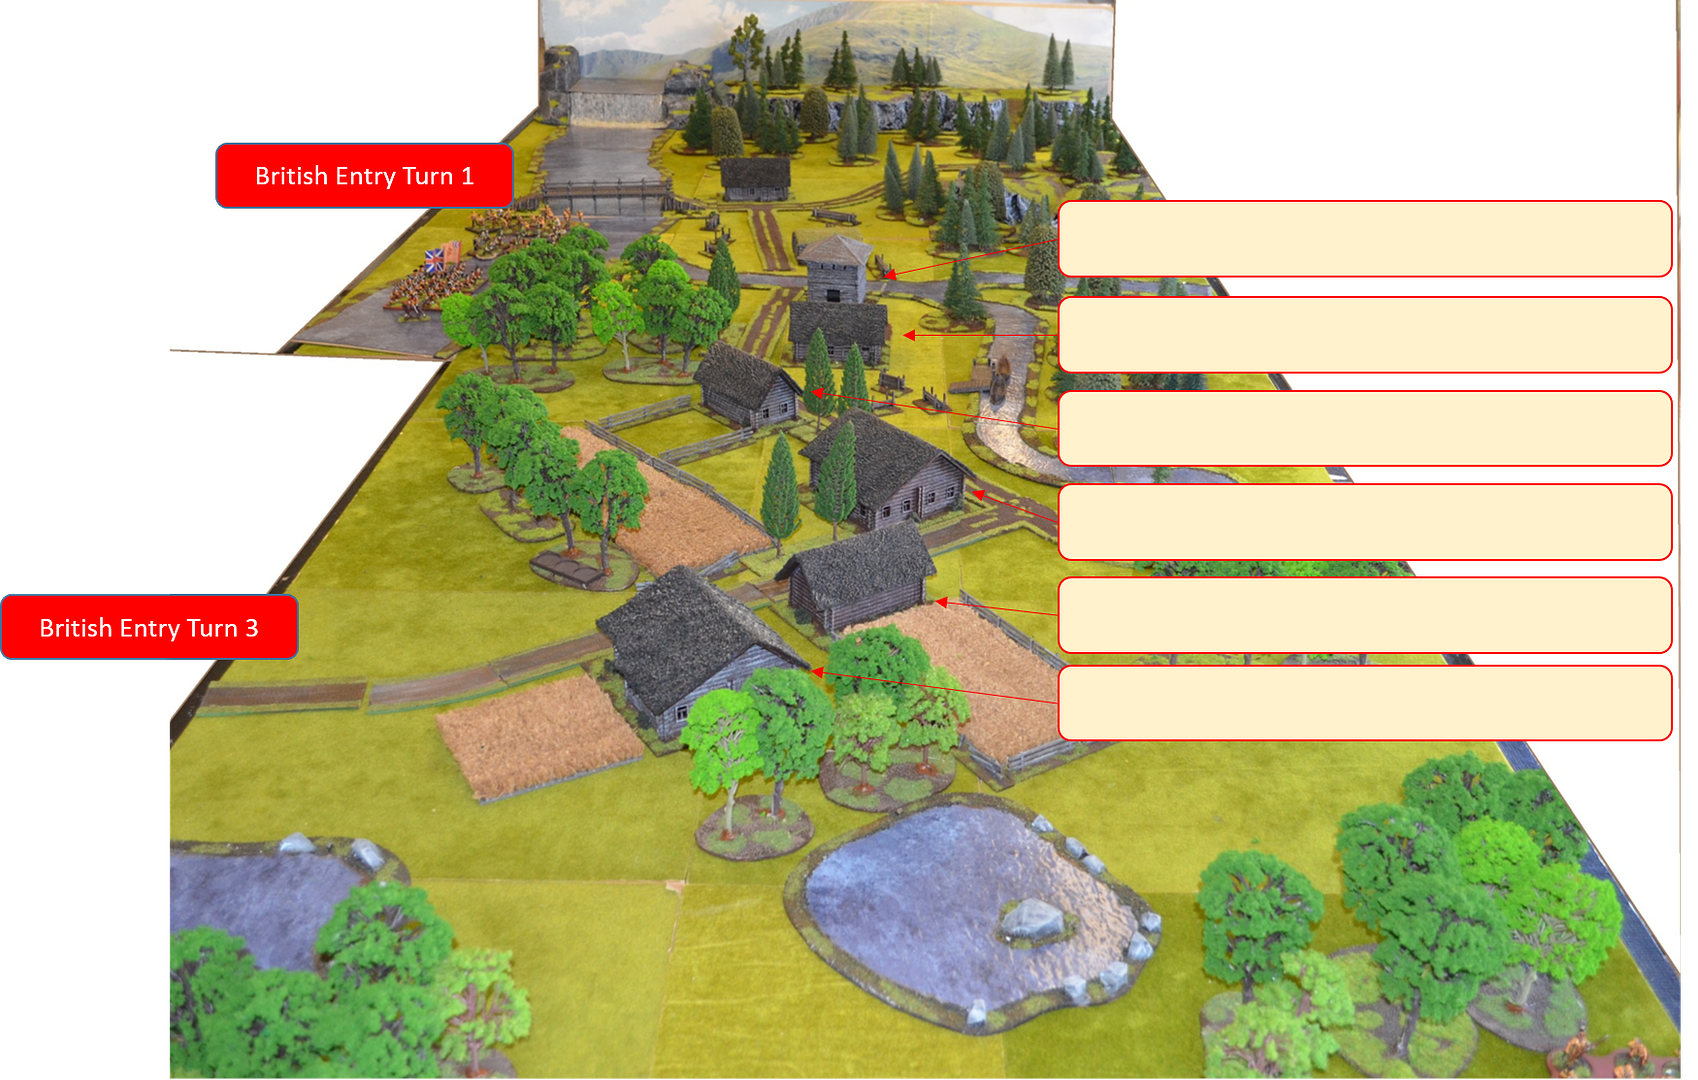
The Order of Battle below is the Towns defence...Mamalute had to write down in the boxes on the map which building was occupied by which unit. The exception being his Indian unit...these weren't allowed in the house but had to be placed somewhere within the village.

The units below were those that came on from the bridge in the top of the map - commanded by jimbibbly
And this unit would come on in turn three on the southern road
The Battle for Hatchet Creek – French Forces Information & Background
Over
the last couple of years British settlers have established a small but thriving
community in the region known as Hatchet Creek.
Fur
trading with local natives have
established this village on the map as a primary source of beaver pelts for the
ladies in the colonies.
Over
the last fortnight you have persuaded the local natives that it is in their
interest to trade with the French colonies only. But to reinforce your
chokehold on supply the trading post at Hatchet Creek needs to be destroyed.
Unfortunately
one of the locals didn’t quite like this monopolistic ideology and tried to
warn the British of your attack. Your scouts managed to track him down on the
outskirts of the settlement where he was dealt a grievous wound. Unsure as to
whether your attack has been forewarned you have decided to press home the
attack.
Conscious
that any British relief force must come across the Bridge to the north of the
settlement you have placed an Indian Ambush on the escarpment overlooking the
bridge. They may be activated at any time.
Your
attacking forces come in at the entry points marked on the
map.
Objectives
– ensure that more than 5% of the buildings in Hatchet Creek are burned down
Notes:
The Big River may not be crossed other than at the bridge, the smaller rivers
may be crossed at -half speed, other
than at the ford.
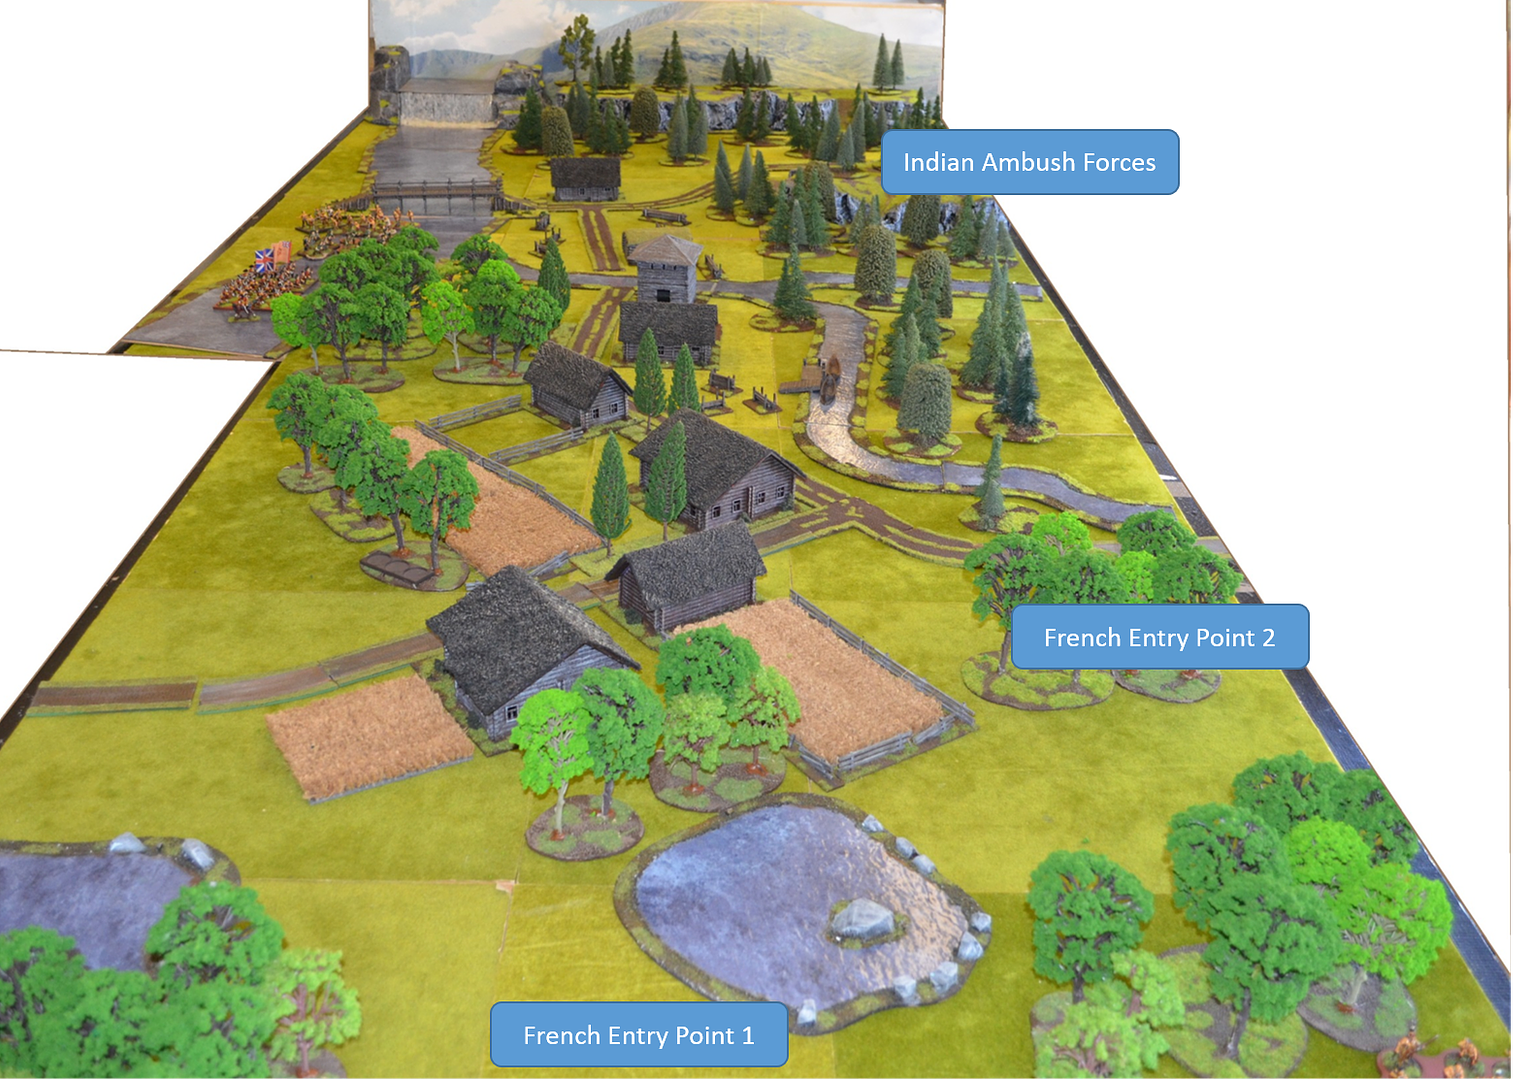
The French forces were commanded by myself and Captain Blood. I took the first of these forces and came in on entry point 1
Whereas the force below came in at entry point 2
The Indians (commanded by Captain Blood) started in the ambush position as marked on the map.
I do find that having these orders of battles prepared before the game not only adds to the flavour of the game but also speeds things along.
The Battle
Now I have an admission to make, I was so engrossed in the pizza, the game and of course the company I completely forgot to take photos. Therefore the following are 'staged' photos after the event but hopefully give a flavour for the proceedings as they unfold.
As mentioned the orders each side either had to defend the buildings or burn them down. With eight building to count this was going to be interesting.
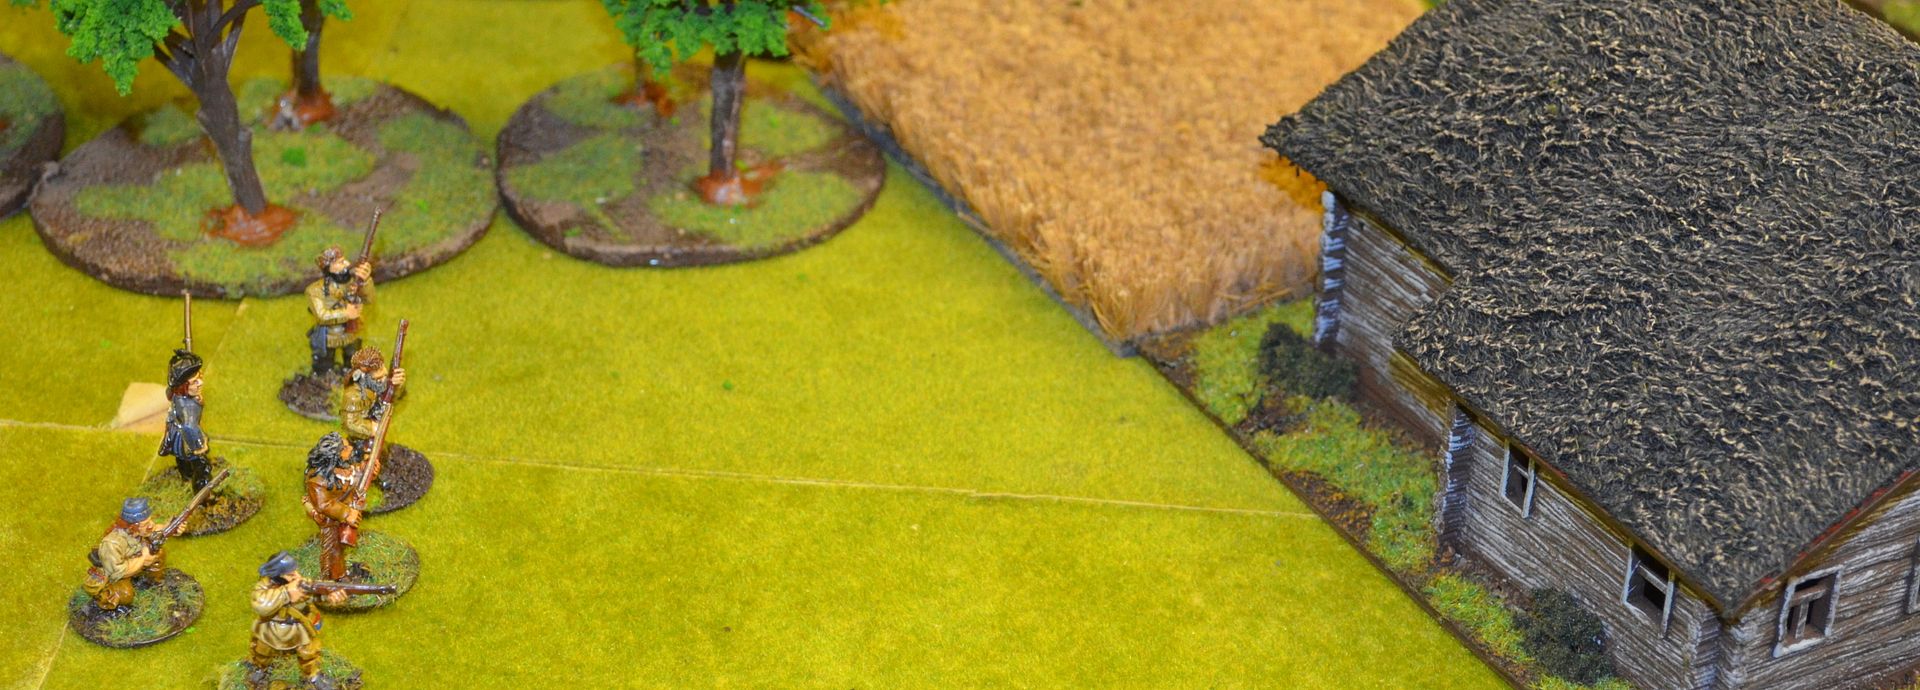
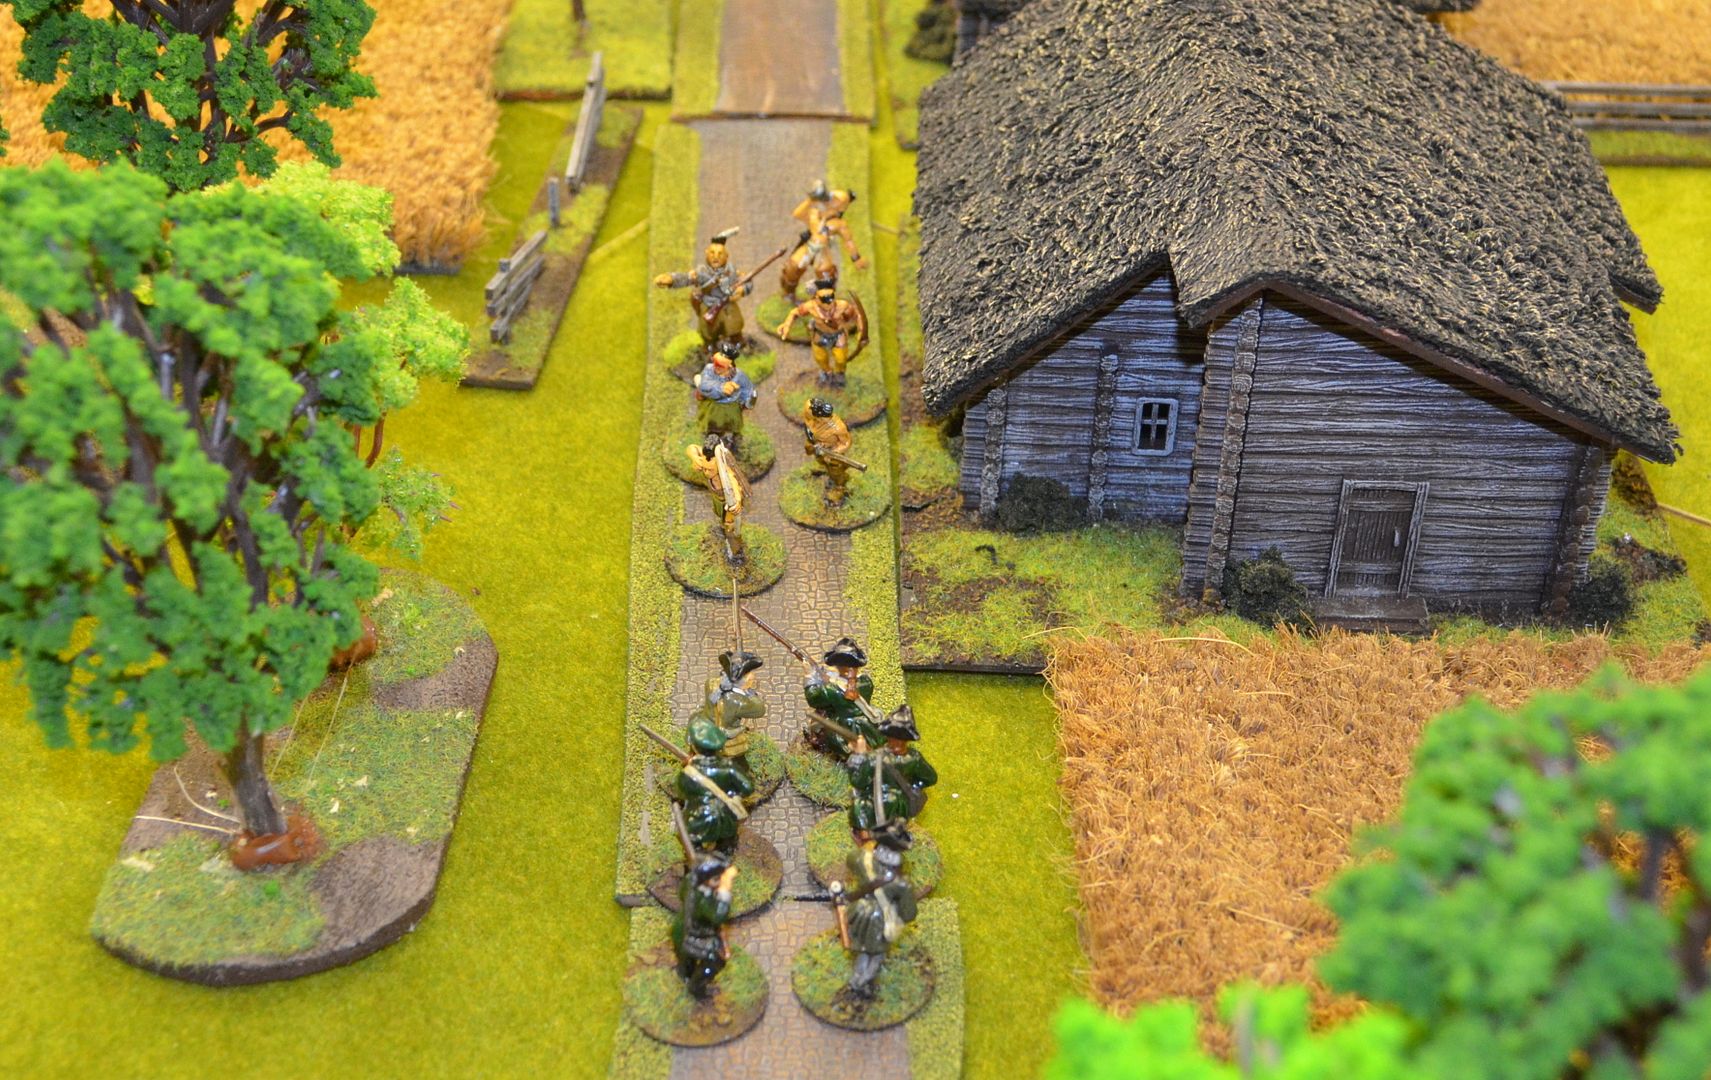
The game could really be described in a number of set skirmishes...
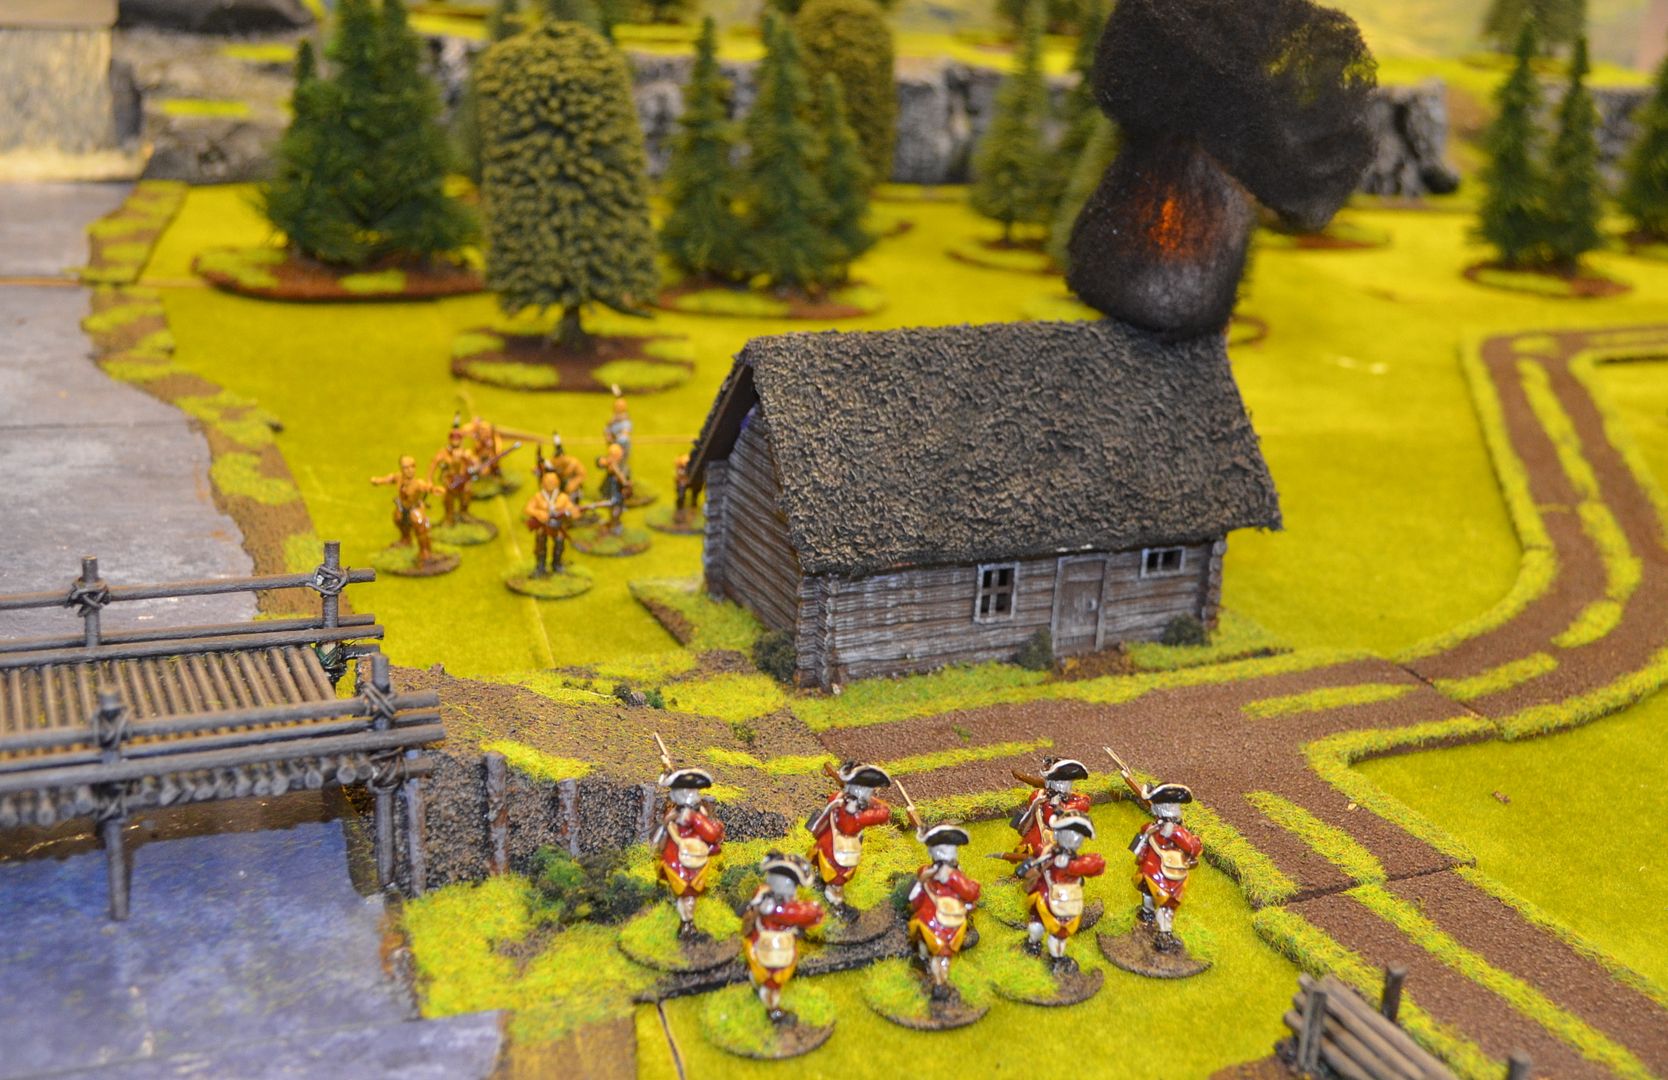
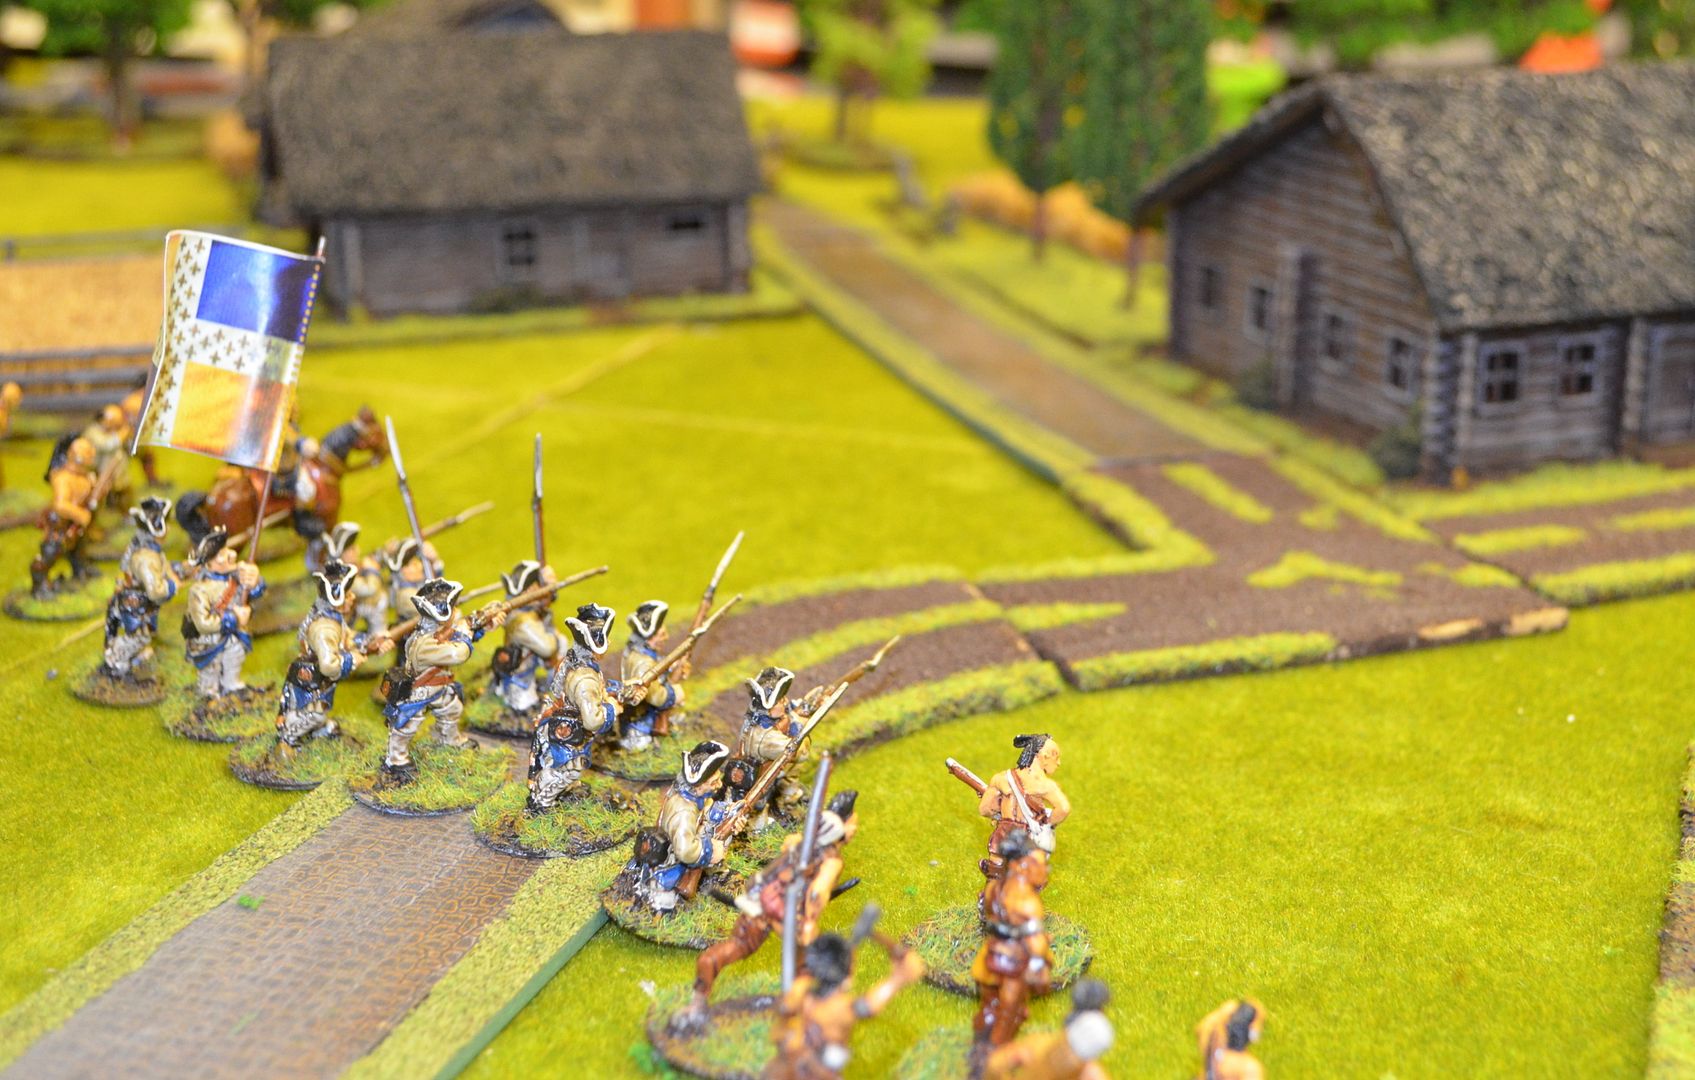
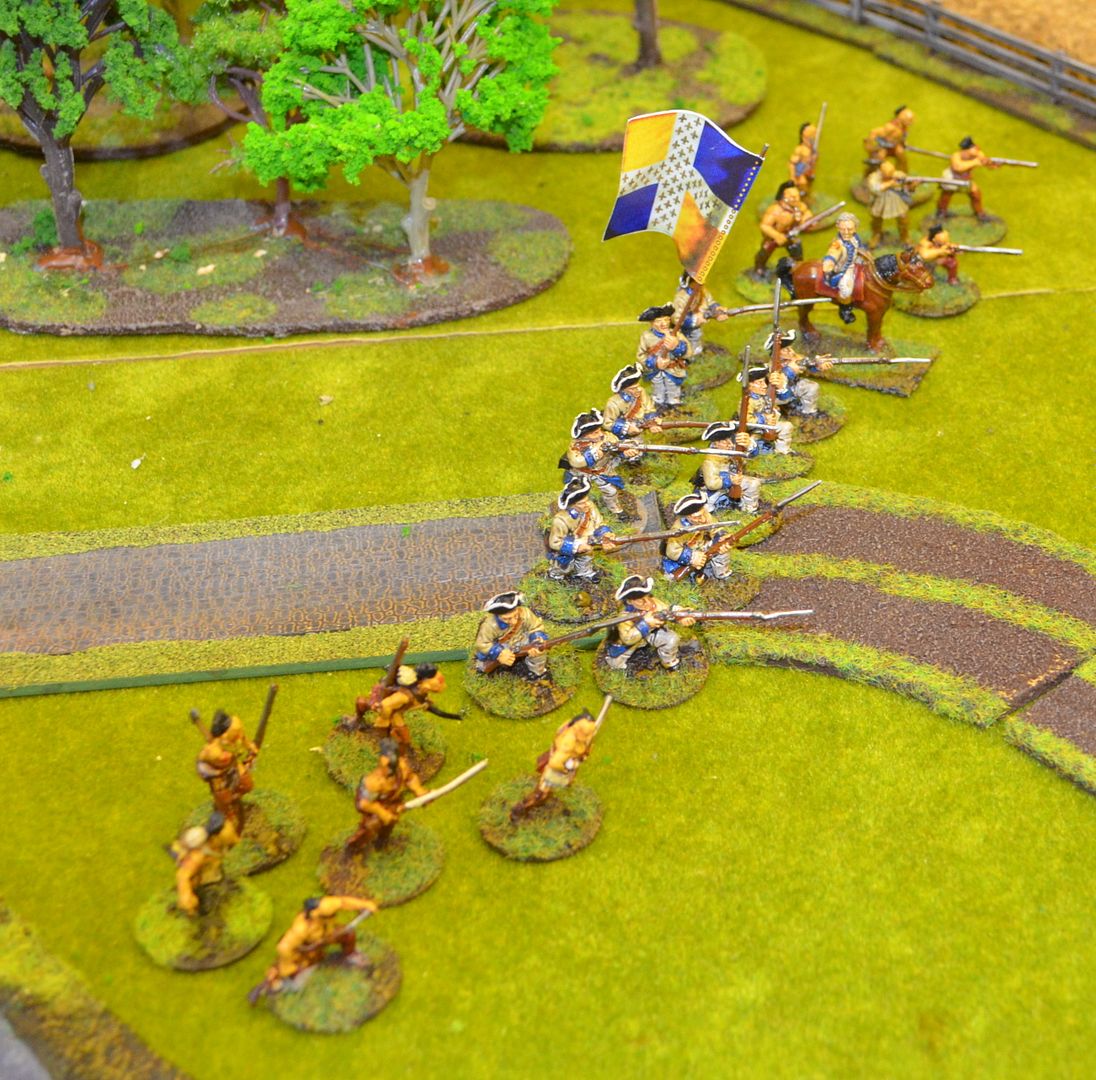
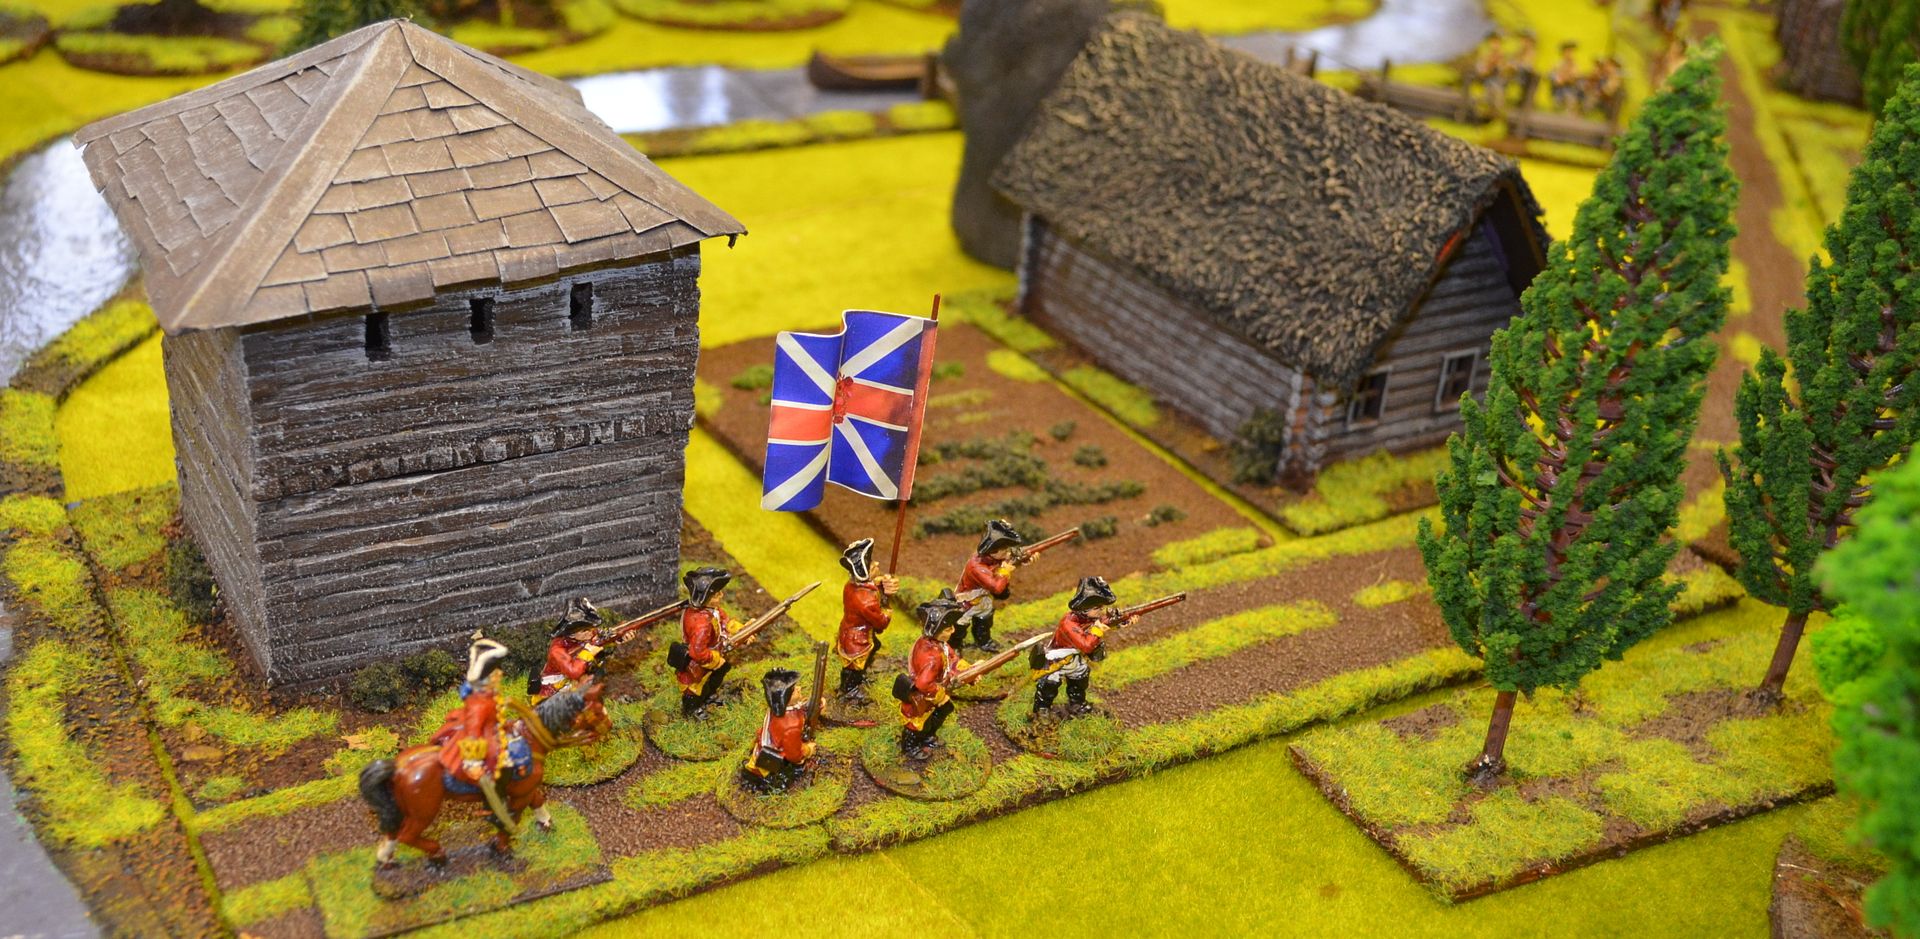
The game started easily enough with the British Relief force marching across the bridge and making their way towards the hamlet. It wasn't until the second turn when they were all across the bridge did the Indians in ambush (hidden on the table) open fire into the ranks of the British line.
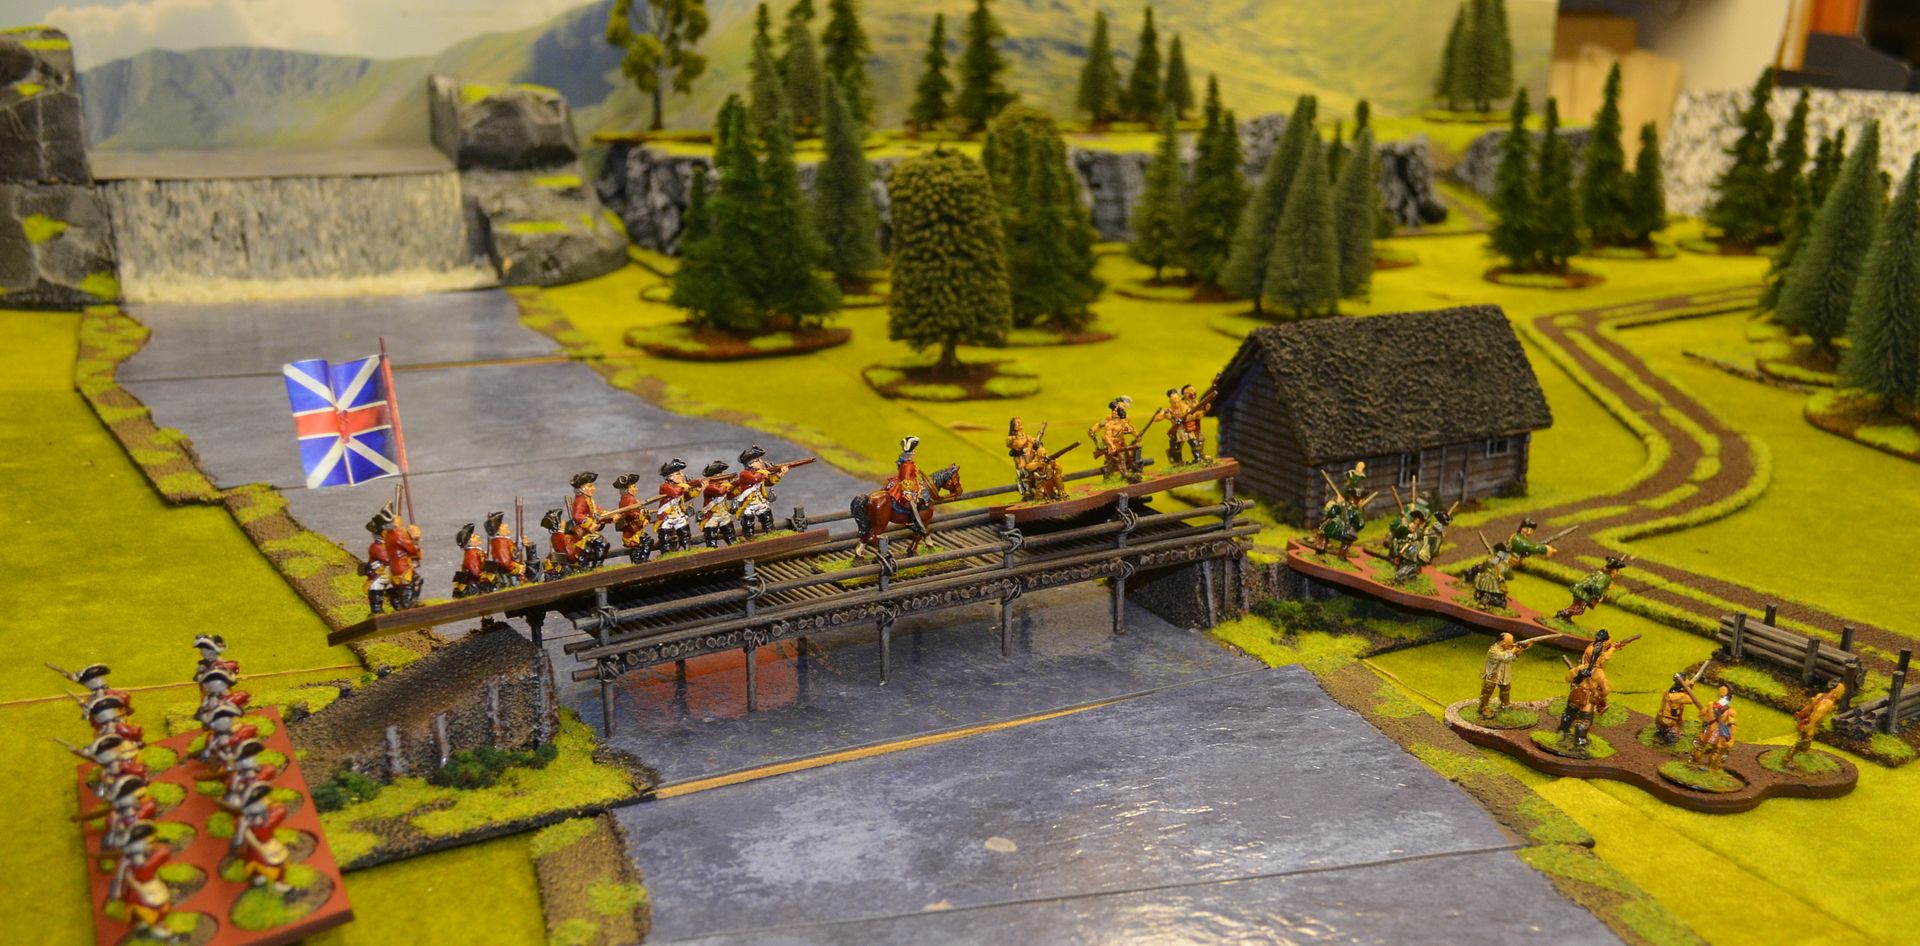
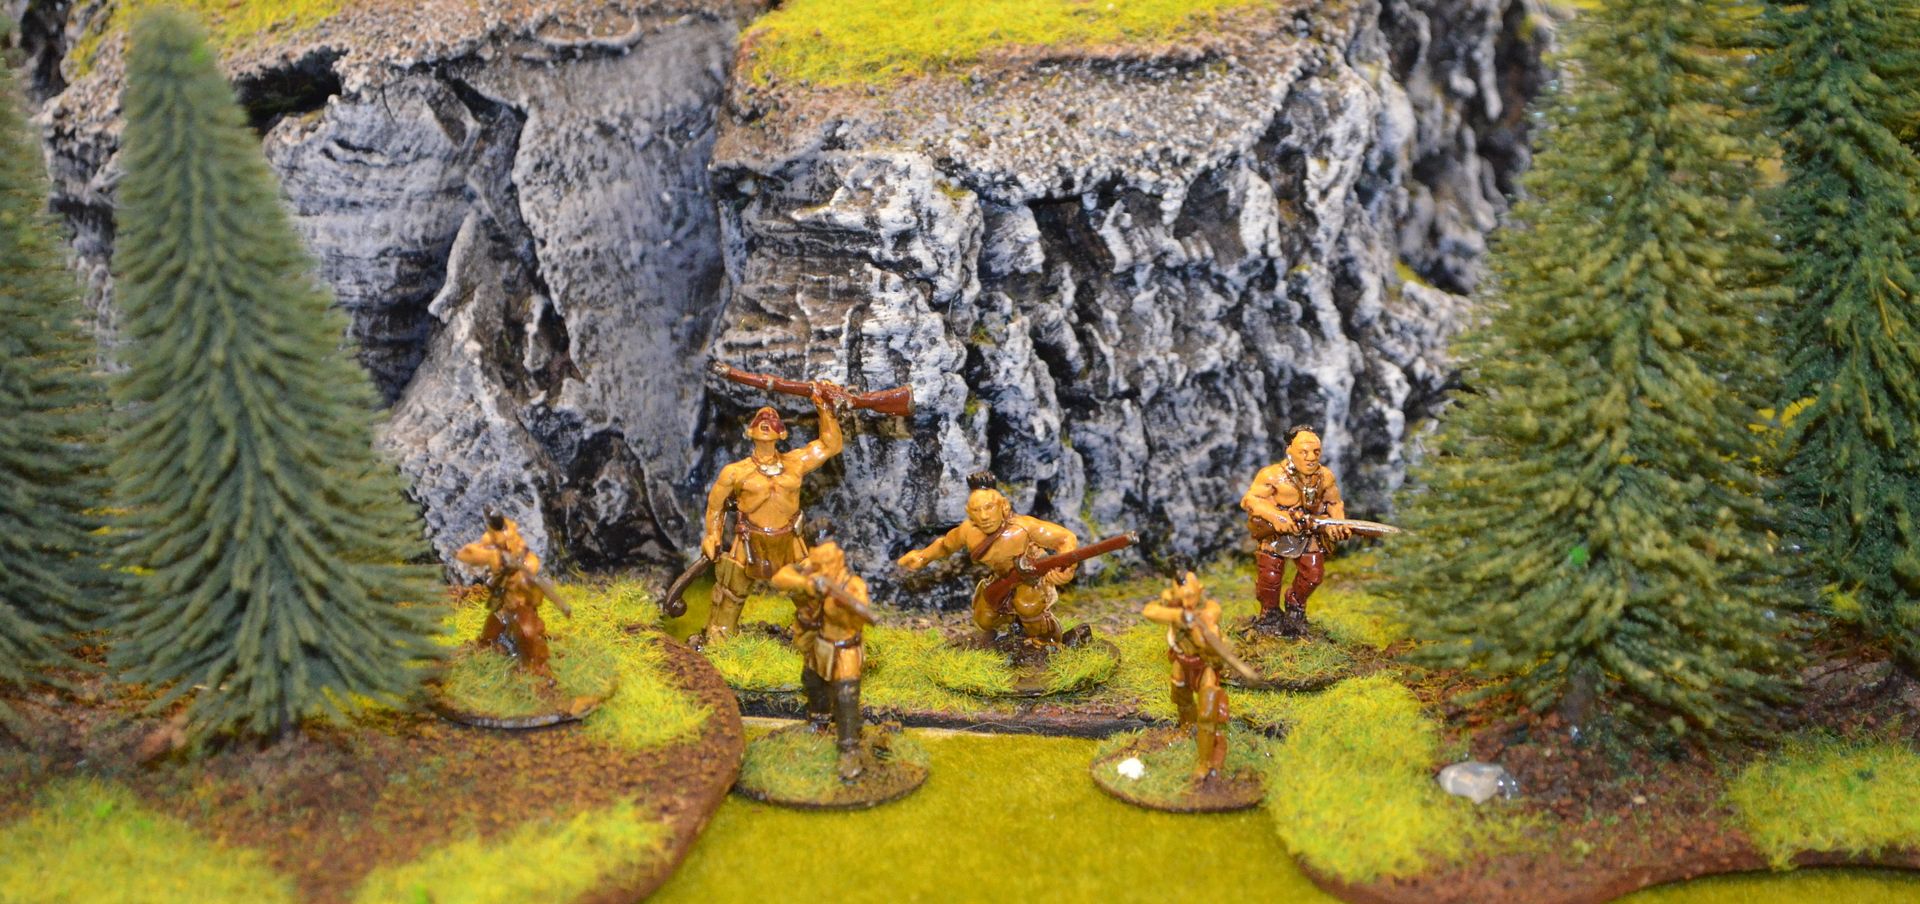
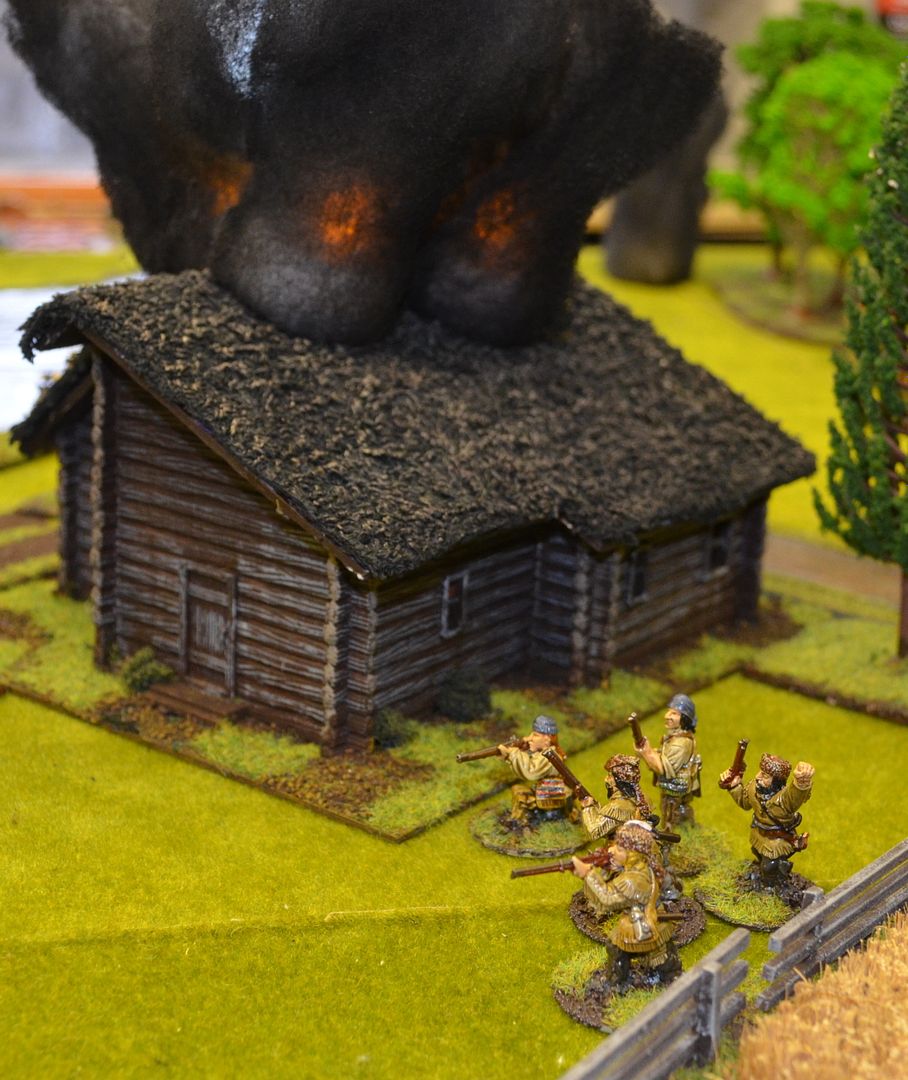
This was devastating and two units of Indians managed to pin down virtually the entire relief force with carefully aimed musket fire from the treeline. As the game approached the third turn the Indians feeling rather brave made a dash for the building on the far side of the bridge and quickly had this burning.
Feeling invincible they ran towards the red ranks still posted around the bridge. Needless to say their luck came to an end and died in a volley of lead.
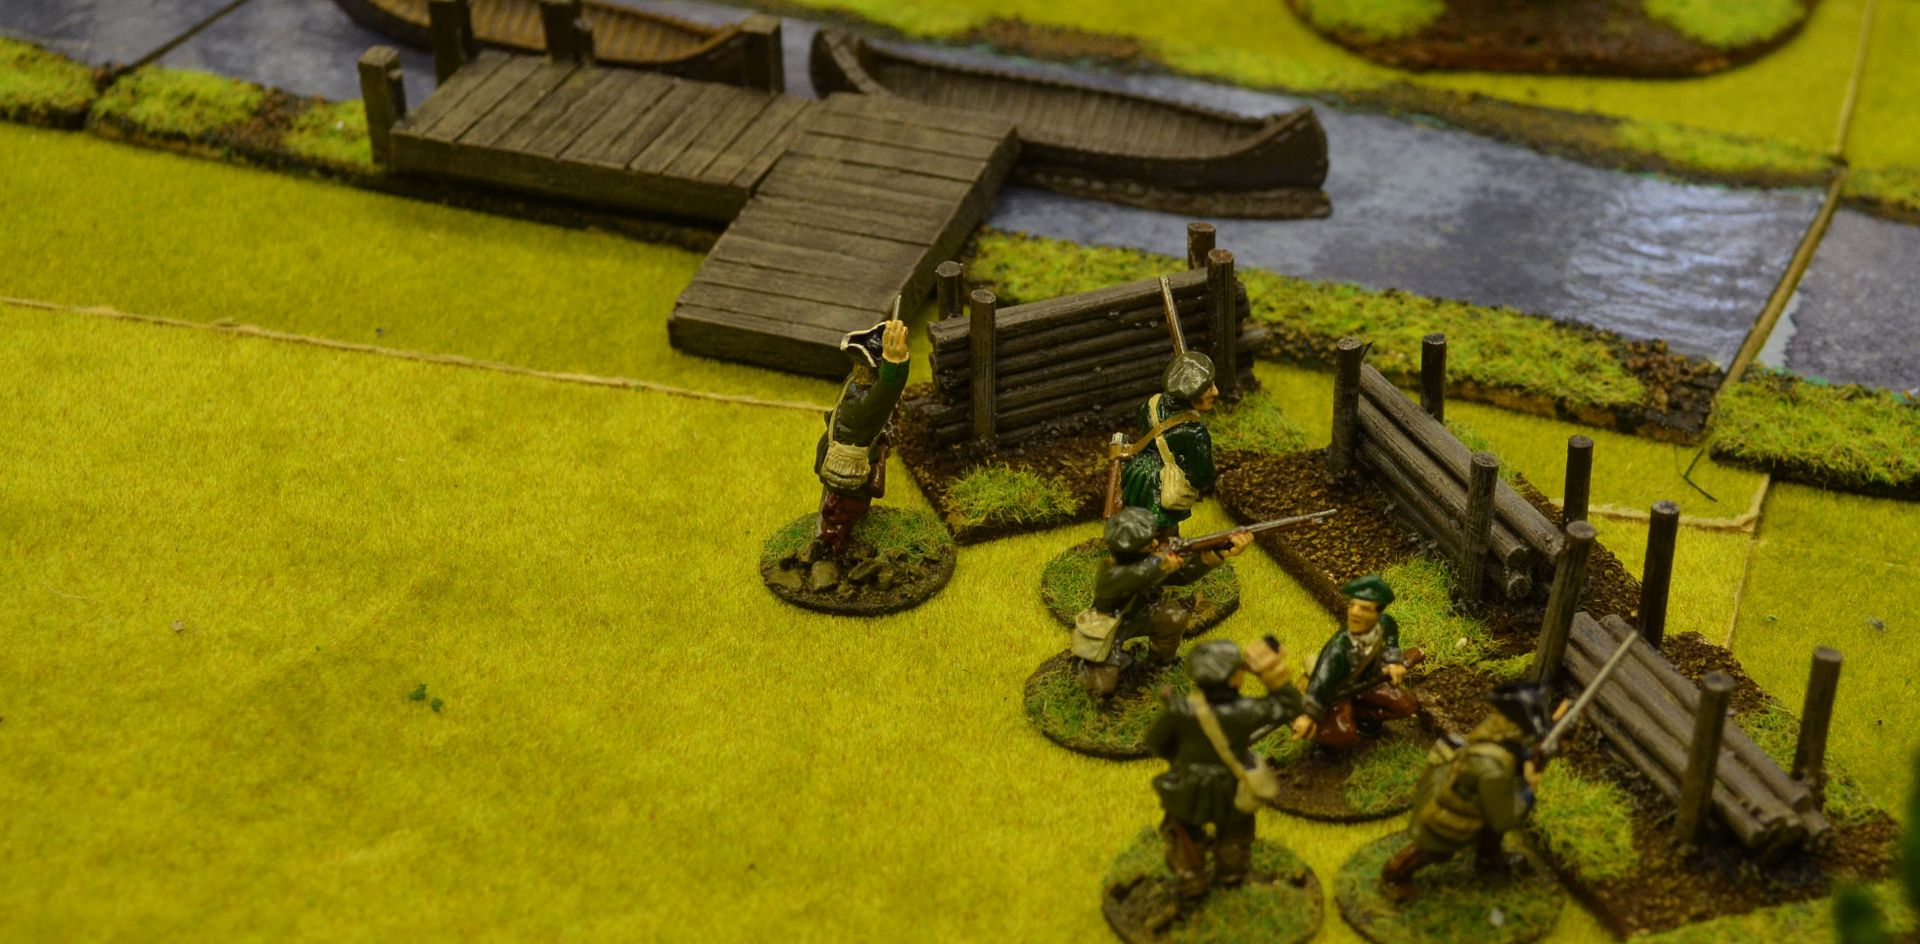
Rangers positioned in the blockhouse kept up steady rifle fire into these units, taking full advantage of their long range and skilful shooting.
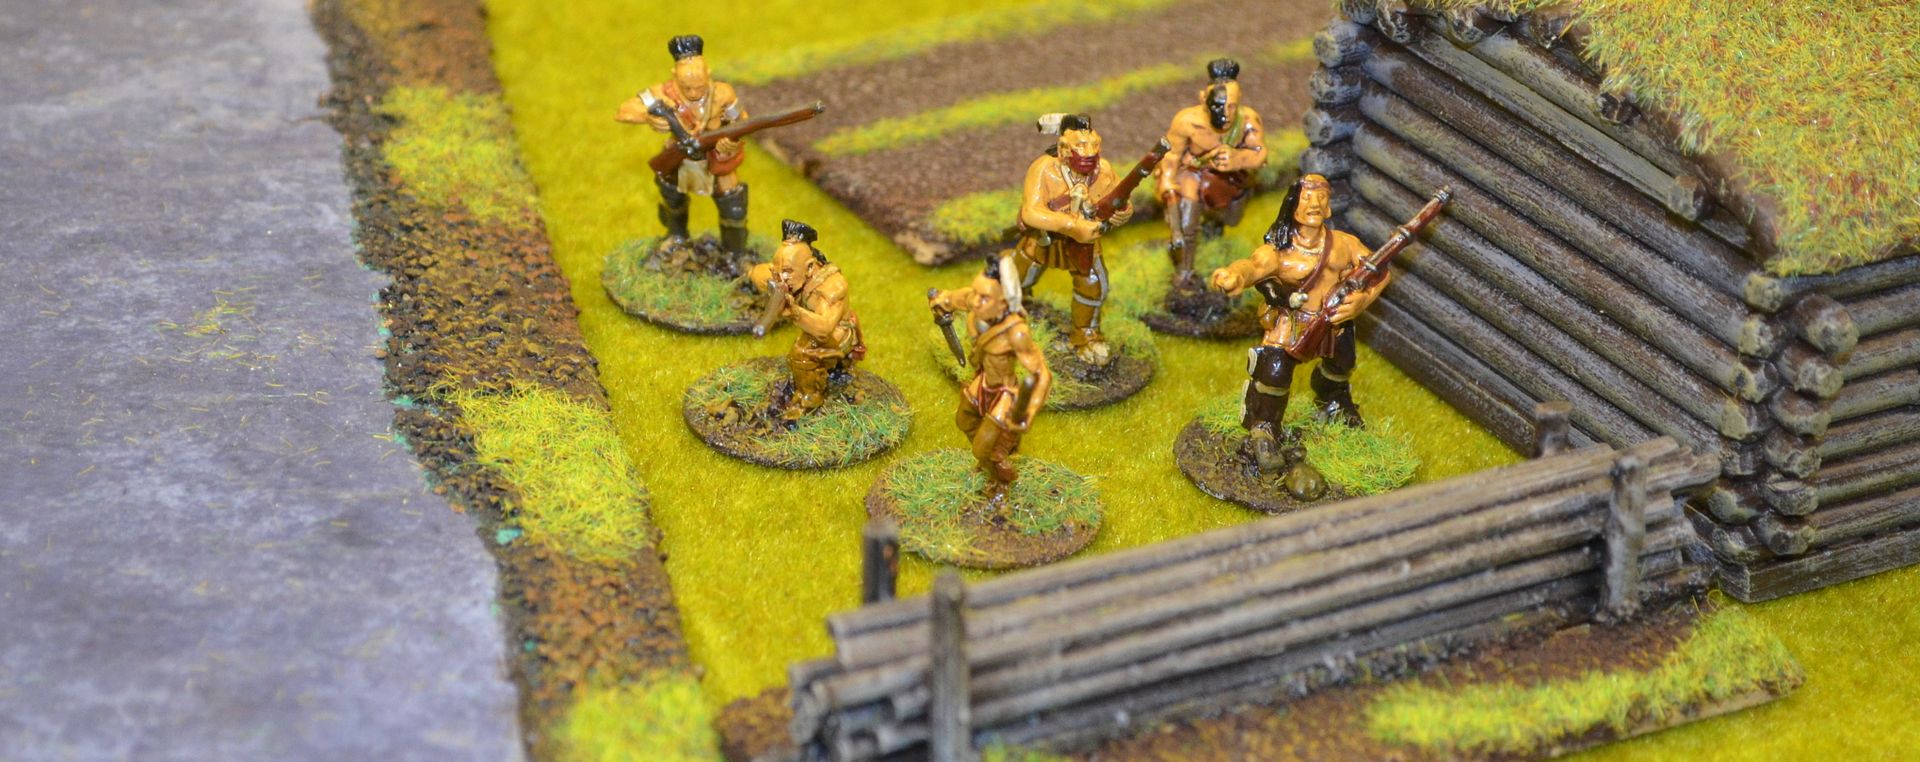
With the redcoat defenders dealt with by a suicidal Indian charge the French were able to push forward into the town.
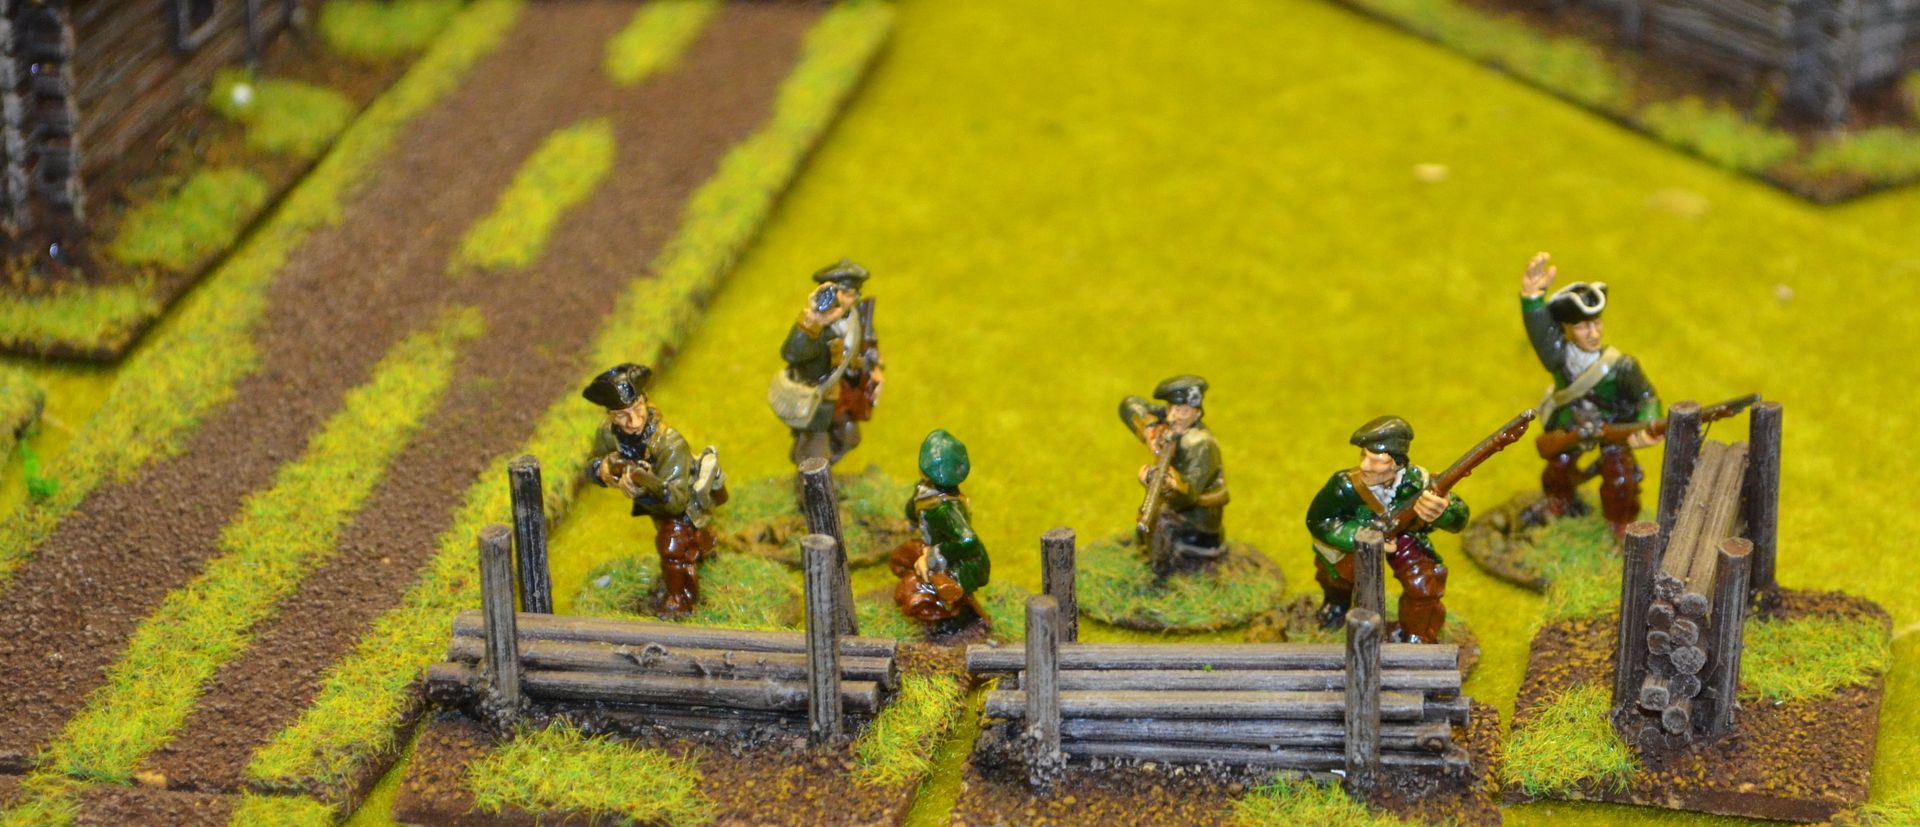
Meanwhilst the French approaching from the South had an easier time of it and despite their slow progress they soon managed to winkle out the militia and get the southern buildings on fire
At which point in time the second British force arrived, we all genuinely thought that this might turn the battle in favour of the British. Alas the dice had their part to play and two of the three reinforcements soon fell thanks to Canadian rifle fire and charging French Indians...
More buildings started to blaze...
By the end of the fourth turn the French had completed their mission - six buildings ablaze and their troops running havoc across the town...
 |
| Marching in time ...but alas out of time |
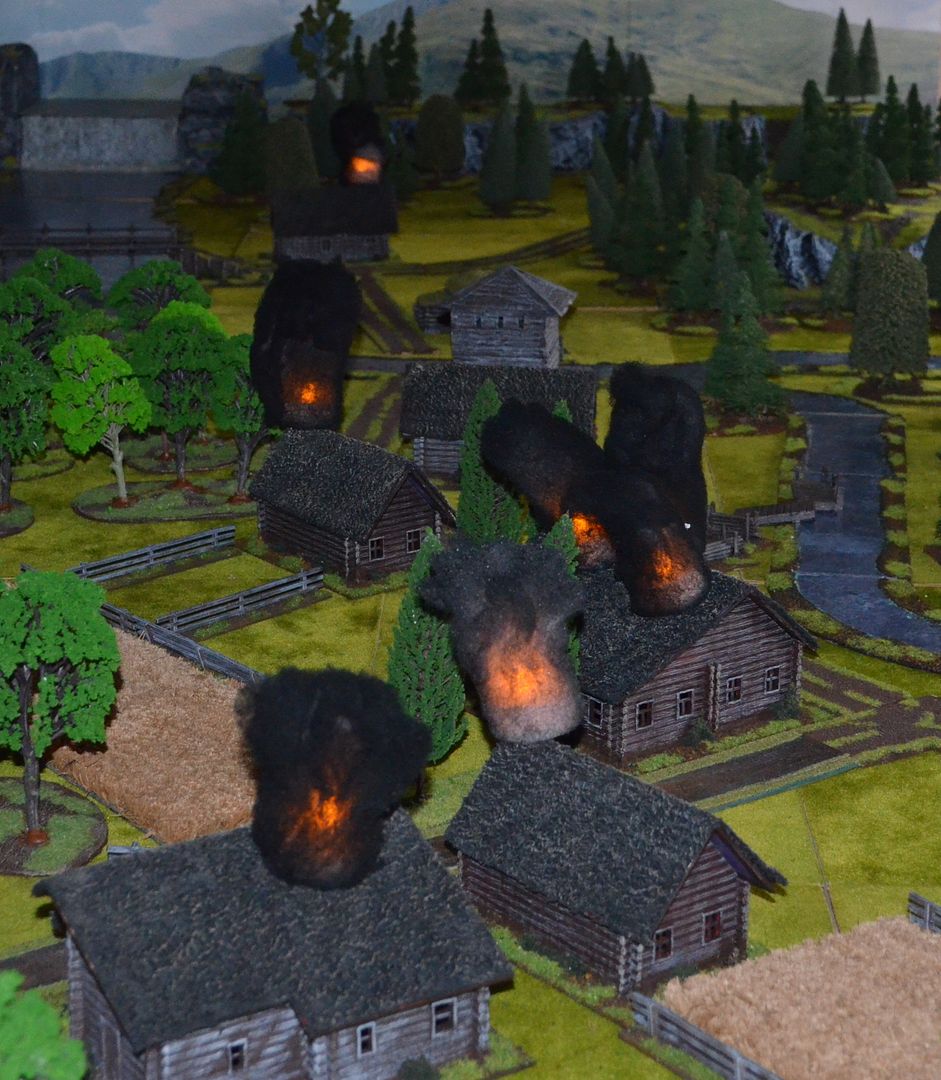 |
| As night fell Hatchet Creek was aflame |
A great game, great company and we were even joined by Dr De'ath on Skype from Dudley !!
Until next time
Table and terrain are just amazing. Great battle report!
ReplyDeleteMarvellous setting, the terrain is fantastic - and so are the minis :) Thanks for sharing :)
ReplyDeletePositively cinematic!
ReplyDeleteThanks for the report really enjoyed
ReplyDeleteGreat stuff! Is the victory condition suppose to be 50% instead of 5%? Thank you so much for the inspiration!
ReplyDeleteThat looks like it was a great game! Reminds me of the games my late friend used to run for us. Looking forward to the next After Action Report!
ReplyDeleteWhat an excellent looking game!! Just love the fire/smoke markers!!!
ReplyDeleteGreat looking game, our group thought we would give it a go, I might have missed it but how big was the table.
ReplyDeleteCheers Barrie
The table was about 5ft by 10ft
DeleteThank you for your comments