Stockade/Fort for French Indian Wars part 2
Hi Folks
Over the last week I have continued to focus on the walls of the fort. When I last left you the walls had been constructed and I had cut the firing platforms from blue foam.
Interestingly a number of people commentated on why the cross spars were on the outside of the walls. I thought long and hard about redoing these but the pain of breaking them up and redoing was quickly discounted. Hopefully folks will see past this mistake once the final product is finished.
Each night this week I have done a little bit more allowing each stage to thoroughly dry before moving onto the next. With work and family commitments this has meant a couple of late turns in the shed just to make sure I keep on track.
The first step was to glue the blue foam base to the back of the wall. These were rough cut in advance and then trimmed using my foam cutter (a great tool for cutting polystyrene – every terrain builder should have one). I just used straight PVA onto the hardboard base (remember rough side up) and then stuck down the foam. These were then left to dry for 24 hours.
The next step involved filling the gap between the blue foam and the back of the wall plus any other gaps. I used a store brand (Homebase) – flexible filler working on the principle that these constructions would contract and expand during their lifetime. Again the filler was left to dry for 24 hours.
Taking the sculpting tool from my foam cutter kit I did a final trim on the blue foam. I also discovered that this cut both the glue that had seeped out and the filler residue – result !
Once dry I turned my attention to the front edge of the walls. There is a slight lip between the edge of the base and the walls. These were painted with glue and then coarse ballast (grit & stones) sprinkled over the glue. Eventually these will be painted and drybrushed browns with static grass and small clump foliage added like all my bases.
Once all of this was dry (and I mean dry) I painted all the sections black. I use black acrylic paint sourced from a craft shop, this is a great product as it both flexes and holds everything together.


Again this was left to dry during the day (I painted them at 6am before I went to work). The back of the walls, ie the ramparts now become my focus. Originally I was going to have these a earth but then I thought this would be totally impractical in real terms and they would certainly look better if flocked.
So now the walls have been filled, based with ballast and undercoated it’s time for the finer details to be added.
The first step was to dress the top of the rampart with an earth coloured flock and the duckboards. The duckboards were made from coffee stirrers – I bought a 1000 off Amazon for £4, but I suppose you could buy lots of coffee from Starbucks,
These were trimmed to the right length. White glue was then liberally applied across the top of the ramparts and the boards laid in place. The flock was then scattered over the top to fill the gaps. This was then left to dry for 24 hours.
Second step was to flock the reverse rampart slope – I considered static grass but thought this would be a bit garish and odd so settled for a dark green flock. This will be sealed using a spray of white glue one everything is painted.

Onto the walls. These have been liberally dry brushed dark brown with a lighter coat of light grey. The sawn log tops were drybrushed with Graveyard earth and a light tan.

The fronts of the walls were then finished off with dark brown and dry brushed snakebite leather (this is how I do all my terrain bases) and then given a few spots of static grass and clump foliage. Complete....well nearly.

Now clearly the inside of the fort should all be churned up - mud etc ,so boards were made. Rather than one board I cut a large one into four giving me several options on the fort layout.

And here they are with a few buildings... I went a bit mad at this point and chucked in a load of scenery, people etc - please indulge me...


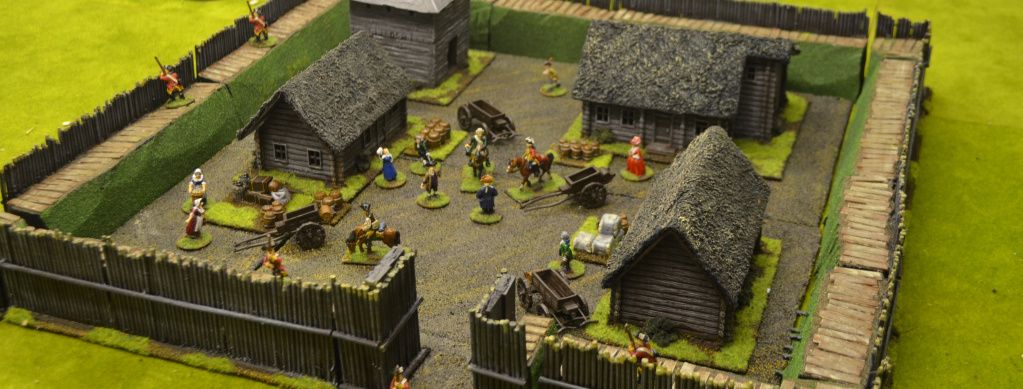
Of course it will look much better when the surrounding area has trees, rivers, villages etc...
Thanks for looking
Eric
Thanks for looking
Eric
This is one beautifully imagined and constructed and painted piece of scenery. Super work, Sir!!
ReplyDeleteThank you Sir, I thank you for all your positive comments...it means a lot
DeleteEric
Eric,
ReplyDeleteYour fort looks fantastic. It inspired me last week to build my own. It's slightly different in that I built wooden fighting platforms and I just inked the wooden bits (walls, platforms and supports) instead of painting them. But your idea of using the modular bases was really brilliant. It's the kind of thing that is as expandable as you like. Right now, mine is rather small, but it can be larger any time I want. Also planning to add corner blockhouses as time allows.
Thank you for such a simple, but elegant project.
Tim
I am planning on towers, but as you say the modular effect allows me to build a long wall, two mini stockades or even a really large corner fort.
DeletePlease send me a link of your work..
Eric
Good work, looking forward to torching it :)
ReplyDeleteExcellent work!! Ignore such silly people (like myself) who commented on the spars. Your model looks great and the spars actually break the monotony of the palisade wall.
ReplyDeleteFrank
http://adventuresinlead.blogspot.com.au/
Excellent work, very inspirational.
ReplyDeleteWow, very impressive indeed, I do like the internal cut out ground sections, they really make a difference to the overall effect. very well done that man!!!
ReplyDeleteThis is great Eric. everything works.
ReplyDeleteBob
I always had a certain attraction to the Pallisade style Forts and must say you have done a great job, very pleasing to the eye.
ReplyDeleteReally impressive! Great blog!
ReplyDelete