Tuesday, 14 January 2020

Battle of Newbury - part 3


For the previous Part 2 head here

In this post I am going to address Commanders , Deployment and the Rules Changes imposed on the game. This will be the penultimate report before the big one that will follow post game on Sunday.


Commanders


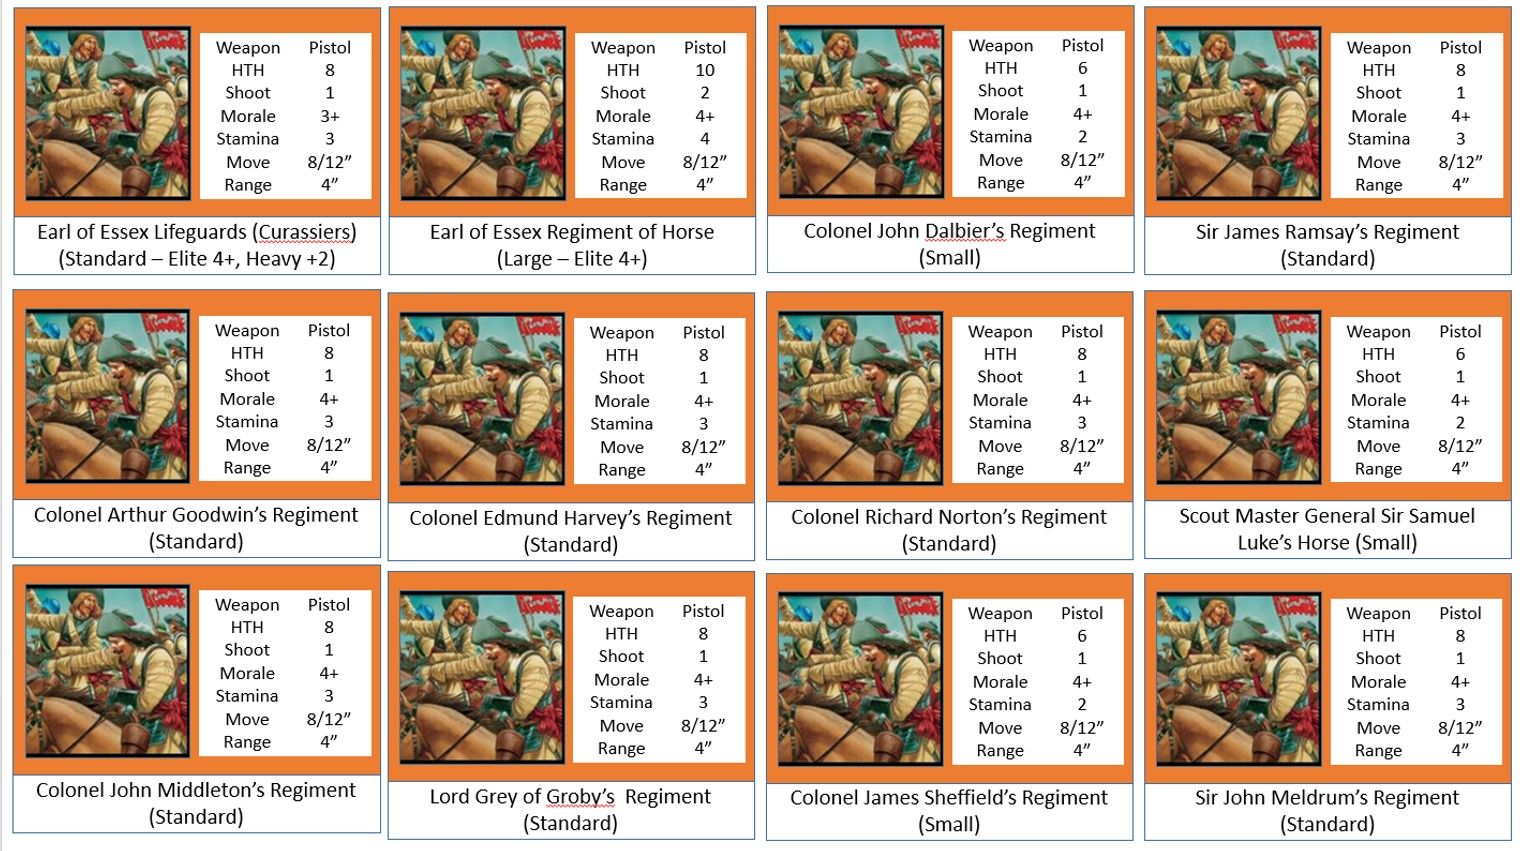
As mentioned previously every unit is going to have a designated regiment card illustrating that force's size, its abilities and other key stats. The regiments are grouped into battalia according to the order of battle as shown in part 2.

The commanders will be positioned in the vicinity of these units. Each commander has his own command card. As illustrated in the picture below. Most of the pictures actually denote the right person from historic portraits. 
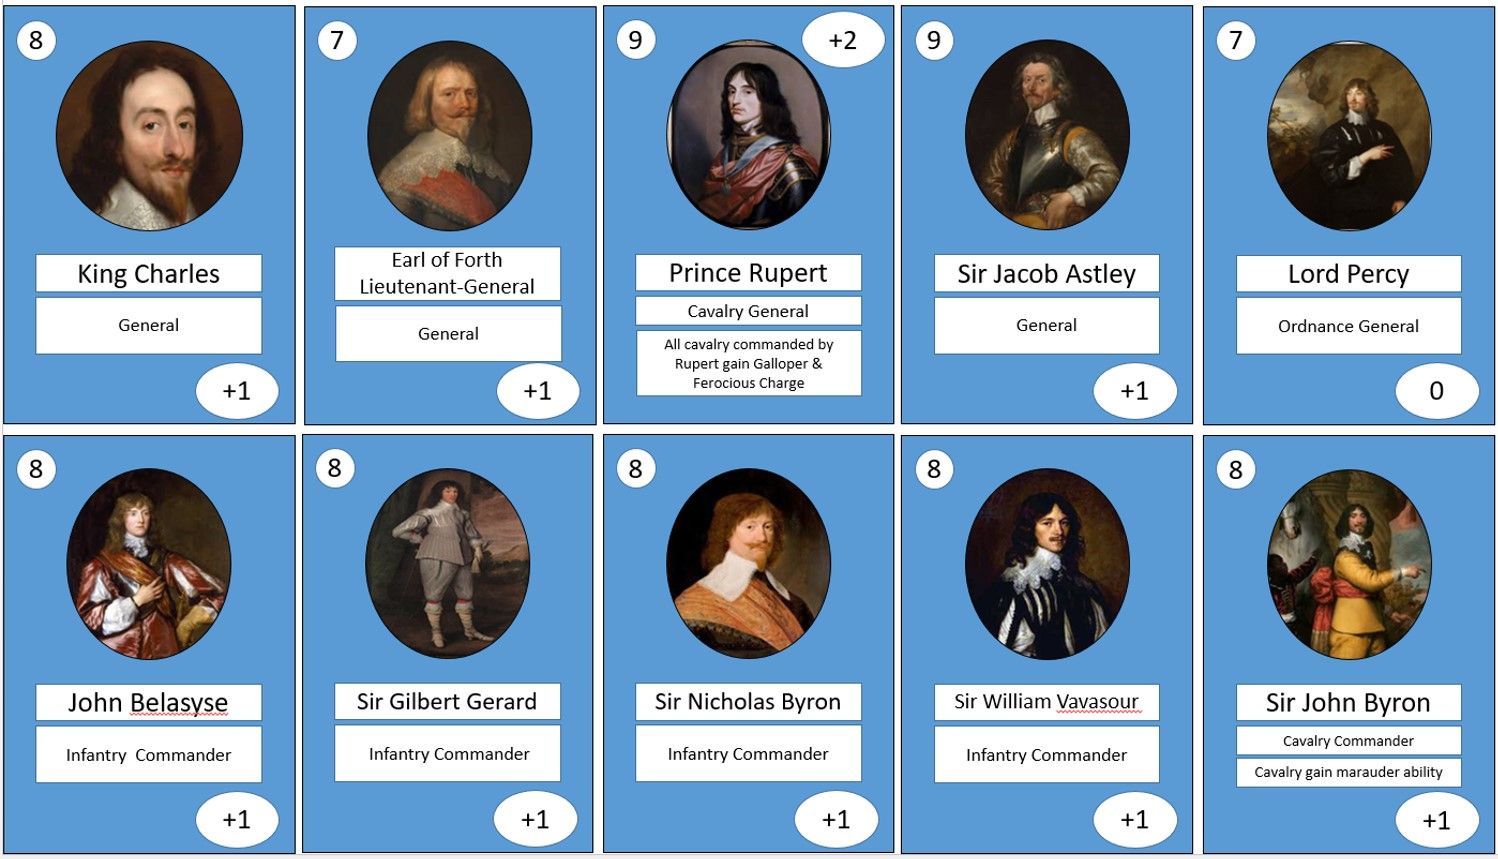

These cards provide the command ratings (top left hand corner) but also the strength value if said commander joins the battle. Furthermore they have a command status.

Generals can command any unit, unless it states that they are for example a Cavalry General. Infantry commanders can only command infantry etc. Guns that are atached to infantry battalia can be commanded by infantry commanders.

Assigning roles, commanders and brigades will be made on the Sunday morning. This should be relatively straightforward in sorting out forces across the field.


Number of Infantry Commands
Number of Cavalry Commands
Royalist
7
2
Parliamentarian
4
5

In addition to the 'named' commanders each side will be given three 'Commanders'. As named after the players. For example
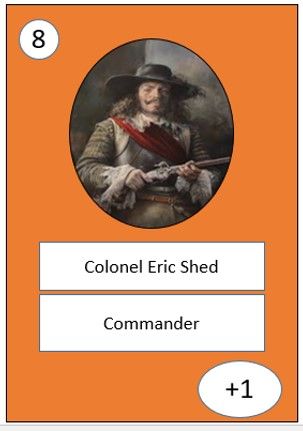

These additional commanders can be used to create new on table battalias and add a further 'personal dimension' to the game 

The average Commander will be responsible for 4 regiments.

IAny Commander/General lost in combat is replaced with a new commander with a 7+ rating   


Deployment

At present the intention is for forces to be deployed according to historic records. 

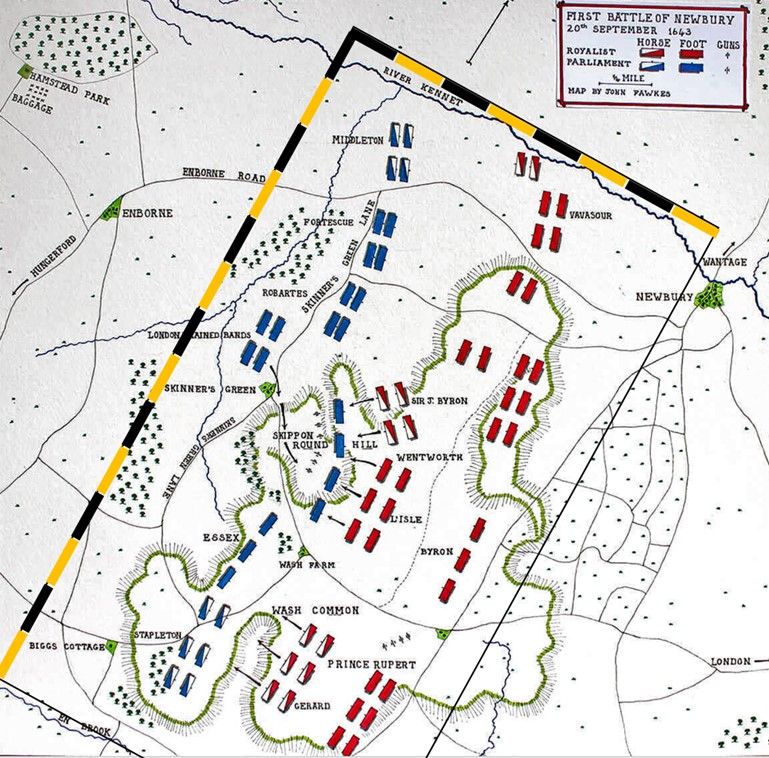
The map shown below illustrates force disposition just before battle commences - our game will start shortly before this point and as such placed 12" further back.
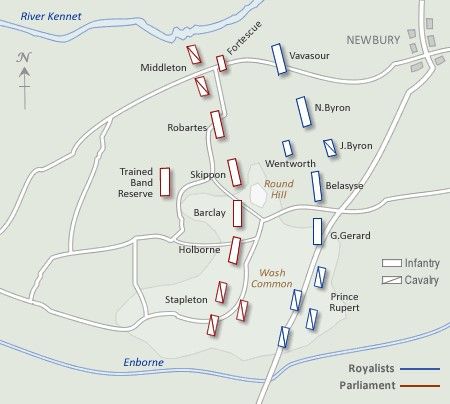


In the actual battle Parliament were able to secure Round hill early in the morning.  I am therefore proposing that the Parliamentarian forces will gain a free command turn before battle commences. This could give them the opportunity to secure Roundhill in the early part of the game - 

Deployment may alter between now and the game.

Rule Amendments

In previous posts I mentioned the changes imposed on movement and shooting ranges. There is one further rule I am going to address.

At present the rules in pike & shotte allow any unit to march up to three moves and then fire away. This feels somewhat counter intuitive for ECW infantry. Cavalry will still be able to do this.

In this game any infantry that moves more than one command will not be able to fire its muskets.

Ammunition

Historic records suggest that powder supplies started to run out in the latter course of the battle on both sides. To reflect this we will post lunch adopt the following rule. 

Any firing unit that rolls 2 ones when shooting will be assumed to have run out of powder. The unit will be marked with a yellow token and will now fire with two fewer dice. This could mean the unit may no longer shoot.


Chance Cards

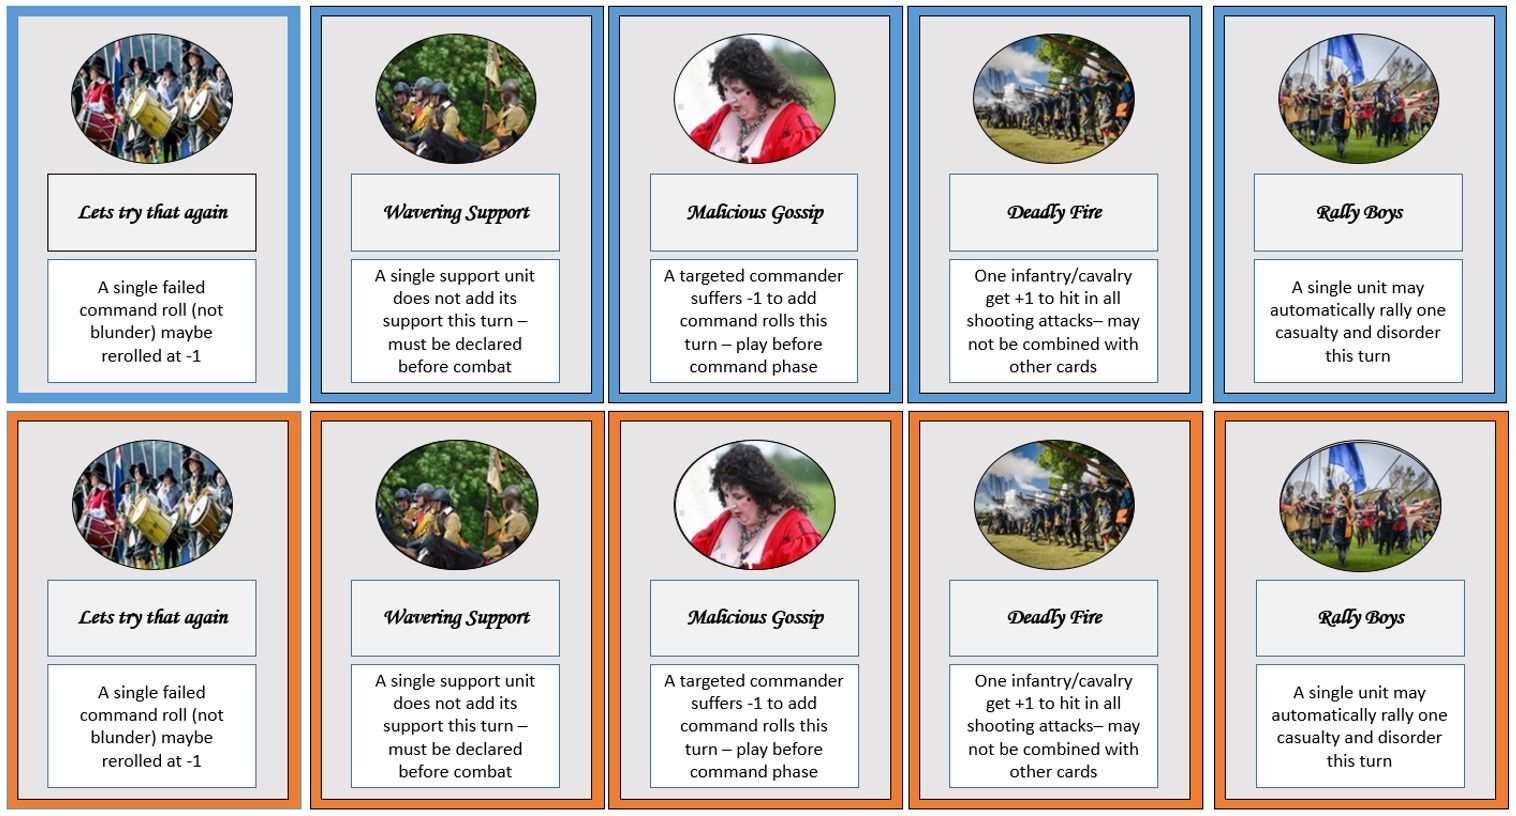
Finally both sides will receive a deck of cards. Both decks are exactly the same (only differentiated by the border colour). The decks are about 45 cards strong and will be shuffled.

Each side will receive five cards at the beginning of the game and will draw a new card every turn. These cards may be played or held. There is no limit to the number of cards each side may hold in his hand.

These cards can be played as and when the circumstances dictate. More often than not they offer a further chance element to the game but also a bit of colour and humour. 

So as Sunday rapidly approaches I need to go off and finish that terrain...

Part 4 the battle can be found HERE

Sunday, 12 January 2020

Battle of Newbury Part 2

The first part of this series of articles can be found here

In this feature I am going to share my thoughts on the forces mustered at the Battle of Newbury


The Forces

According to the research I have conducted both sides were evenly matched with 14,000 men aside. 

However the Parliamentarians had more foot and the Royalists more horse. The table below illustrates the estimates provided from a variety of sources.


Foot
Horse
Total
Parliament
8000
6000
14000
Royalist
6000
8000
14000
Total
14000
14000
28000


Using the Orders of Battle listed on the BCW website and supplemented by the Osprey book of the battle of Newbury I have etablished that the following number of regiments were fielded by each side.

Our game will feature every single one of these regiments/units


Foot Regiments
Horse Regiments
Total
Parliament
21
16
37
Royalist
23
18
41
Total
44
34
78

Despite having fewer infantry the royalists had more foot regiments so be default there regiments will need to be smaller. This is illustrated in the table below.


Average Regiment Size Regiments
Horse Regiments
Parliament
381 men
375 men
Royalist
260 men
444 men
All Force Average
318 men
411 men

I then had to estimate the size of each regiment present and my best resource was the the muster rolls from the BCW website.

For example:
Skippon’s Regiment of Foot (Parliament) in 1643 had a muster of 527 men in August 1643 (1 month before the battle) . As this is significantly greater than the average foot regiment size of 381 it has been designated as a LARGE unit.

Where possible every regiment has been checked for strength and the rating of Small, Standard of Large has been given. In the event that no records exist for strength I have used the average for the respective army.

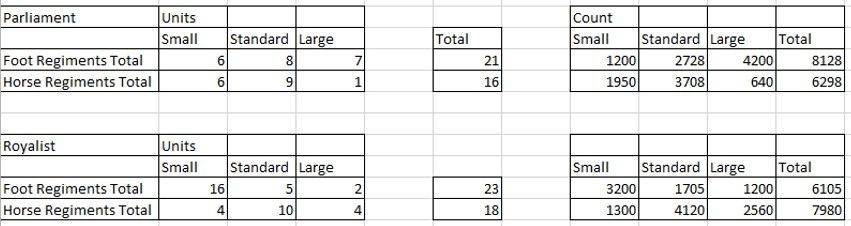
This has created the following ratings for forces:

Please note these have been tweaked to get the final counts correct but still maintain the correct number of regiments.


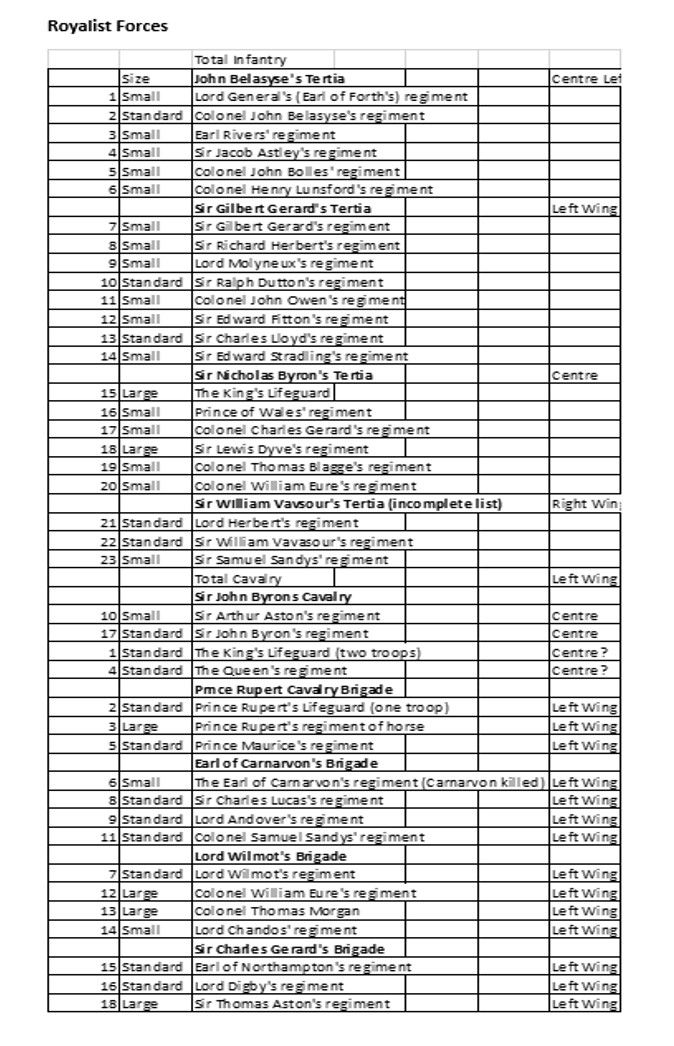
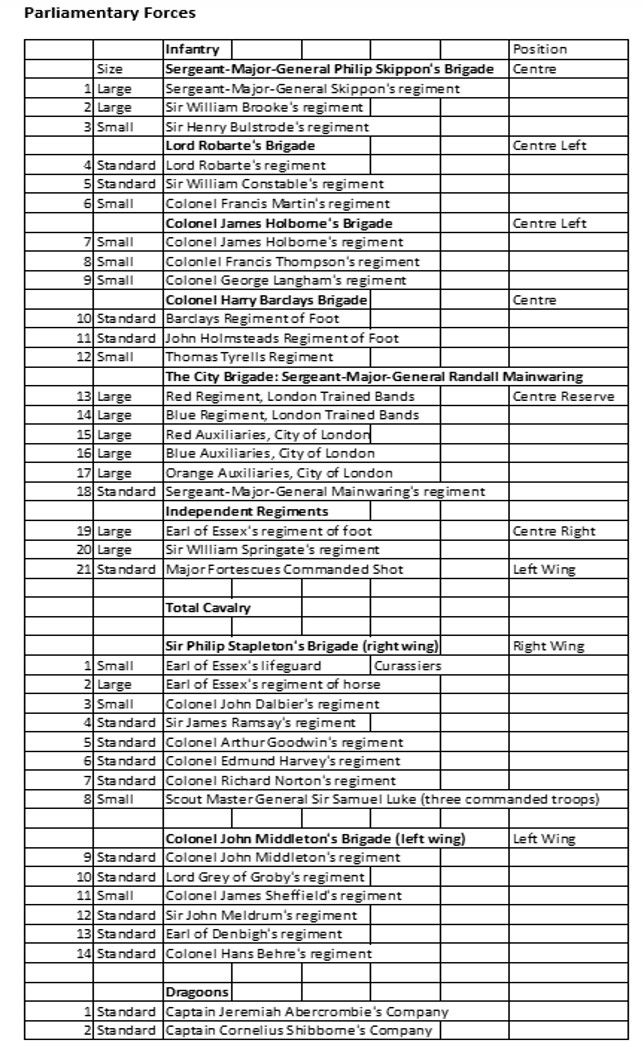
A full order of battle for each side is listed below.
The following units are designated in the game
Foot Regiment (this includes Pike & Shot)
                Standard Shot & Pike
                Commanded Shot
Large units will be denoted by a mix of Pike and Shot as 32 man units (eg 16 pike & 16 shot), Medium as 24 man units and small 16 figure units
Cavalry Units
                Royalist Cavalry (Galloper rules)
                Parliamentarian Cavalry (Caracole Rules)
                Parliament have one unit of Currassiers
                Dragoons
Large Cavalry Units will be illustrated as 8 figures, standard as 6, small as 4

Artillery
                Light Guns
                Medium Gun

Royalist Forces


Parliamentary Forces


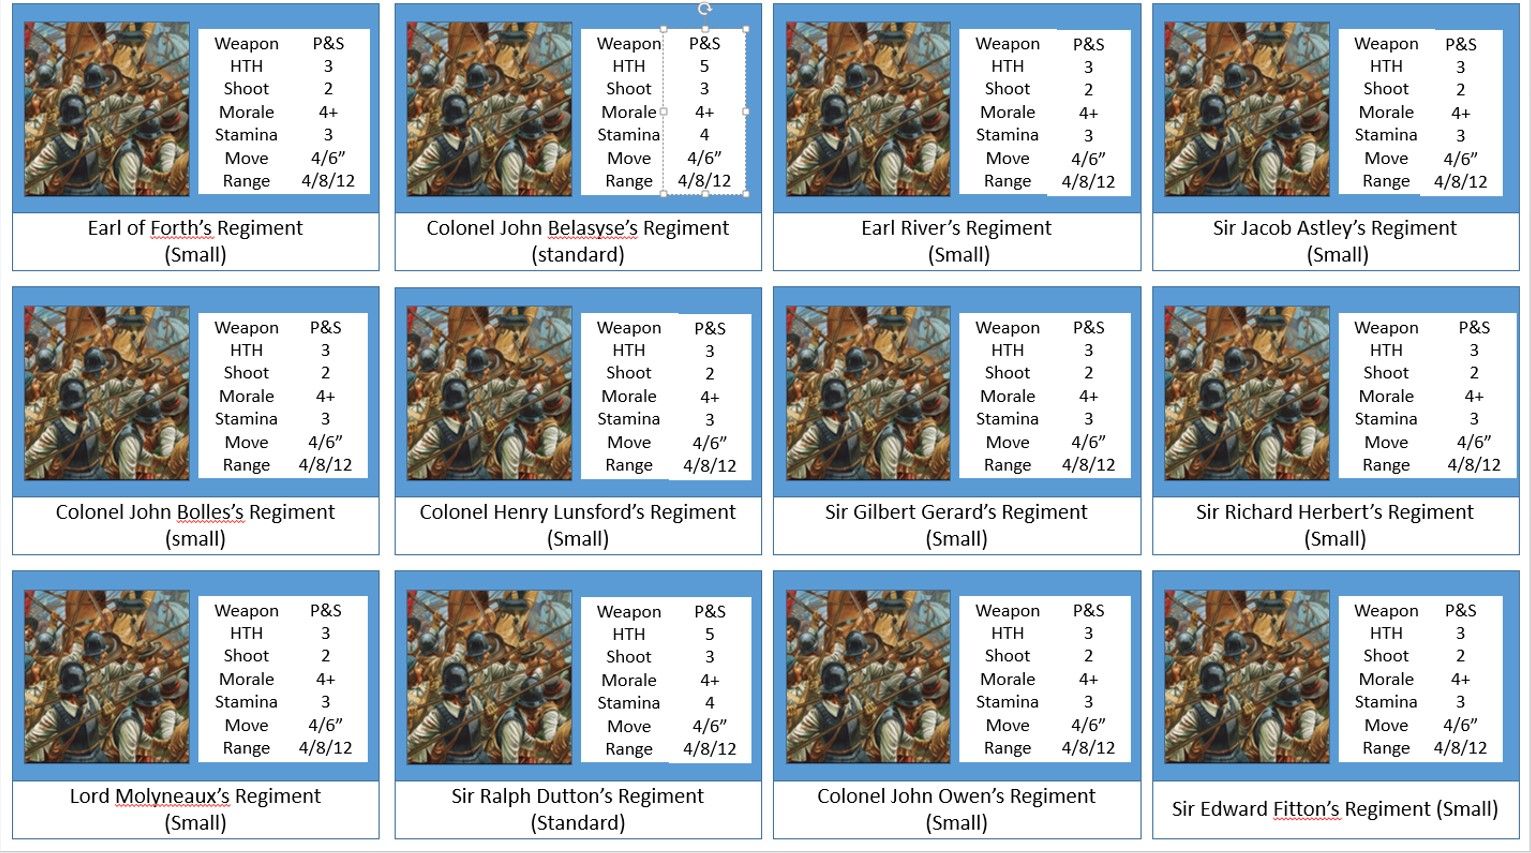
The next step was to create cards for each of these regiments with the relevant information on every unit. For consistency purposes if the card has an Orange boarder it is a Parliamentarian unit and Blue denotes Royalist

All the cards have been created using powerpoint and then laminated for play.

example of Royalist Infantry


example of Parliament Cavalry


In my next article I'll cover the commanders and unit deployments

part 3 can be found here

Friday, 10 January 2020

Time for an Audit - Its a bit scary


Morning All

Its time for an audit – with the shed rapidly approaching its fifteenth anniversary (and this blog will has just turned eight years old) I thought it would be appropriate to do an audit of what I actually have in this wooden building.

The following tables span the scales and genres that have seen table top action

Edit: I should state that these are all painted and that my lead pile is virtually non existent. 

Period
Army
Scale
Number of Figures
Ancients
Mythological Greeks
28mm
Approx. 100
Ancients
Celts
28mm
Approx 800
Ancients
Imperial Roman
28mm
Approx 550
Dark Ages
Saxons/Vikings
28mm
Approx. 700
Dark Ages
Normans
28mm
Approx. 600
Early Medieval
Robin Hood Outlaws & Peasants
28mm
220

Crusaders/Barons War
28mm
250

Saracens
28mm
400
Late Medieval
Hundred Years War English & French
10mm
1500
English Civil War
Generic Pike & Shotte
28mm
800
French Indian Wars
Indians
28mm
90

French
28mm
80

British
28mm
100

Civilians
28mm
80

Pirates
28mm
100
Napoleonics
French
28mm
750

British
28mm
600

Portuguese
28mm
150

French
10mm
700

British
10mm
700
Colonial
British AZW
28mm
250

British Sudan
28mm
300

Zulus
28mm
650

Dervishes
28mm
700

Afghans
28mm
250
Very British Civil War
All Factions
28mm
300
WW2
British
28mm
100

German (inc Afrika Corps, Paratroopers)
28mm
200
Fantasy
Heros & Monsters
28mm
200

Warmaster Armies
10mm
3000

Lord of the Rings
28mm
250
Sci Fi
All Factions
28mm
300


By my reckoning that's about 15,000 figures - better not tell Mrs Shed !


Thursday, 9 January 2020

Battle of Newbury - part 1

Happy New Year !!

I hope you all had a fantastic Christmas and New Year. Personally I had a great time with lots of Family events, drinks with friends and even managed to squeeze in a few boardgame nights.

Attention is now turning to our big annual weekend game. For the last couple of years I have turfed Mrs Shed out of the house and set up a mega table in the warmth of our Dining room. (the Shed is too cold to frequent at the moment)

Last year we fought Hastings and the previous year we fought Isandlwana/Rorkes Drift. This year we are turning our attention to another historic battle of history - the first battle of Newbury in the English Civil War.

As best we can we will play the battle using a custom built table with the right topography, the named regiments, and as best we can fathom the starting deployments of the battle..

Ultimately this gives me the opportunity to focus on a singular subject for a few weeks.

As mentioned above we are going to be re-fighting the first battle of Newbury. Fought during the English Civil War the battle serves as a pivot point between the fortunes of the Royalist and Parliamentarian cause.

With defeat at Newbury in September 1643 the Kings cause was very much on the back foot whereas had he of prevented Lord Essex’s retirement to London history might have been very different.

In the following blog post you will read that the forces at Newbury were evenly matched but their force composition differed. In summary, cavalry were more numerous in the King’s army whereas Parliament held the advantage of infantry numbers.

Using the Pike & Shotte rules from Warlord Games I have tried to accurately recreate the forces present by describing the regiments as either small, standard or large. More on this later on.

My research material has come from a variety of sources (namely google, the British Civil War website and these books.


The Table:
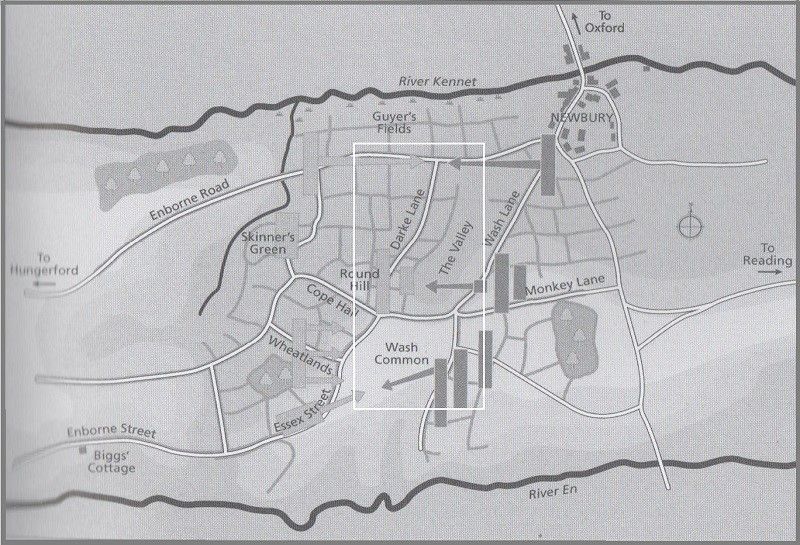
As per Hastings last year it is my intention to build a table in the kitchen that will probably be around 6ft x 12ft in size. This will reflect the battlefield running north south as illustrated in the picture below.
The actual battlefield is around 2 miles by 4 miles in size.

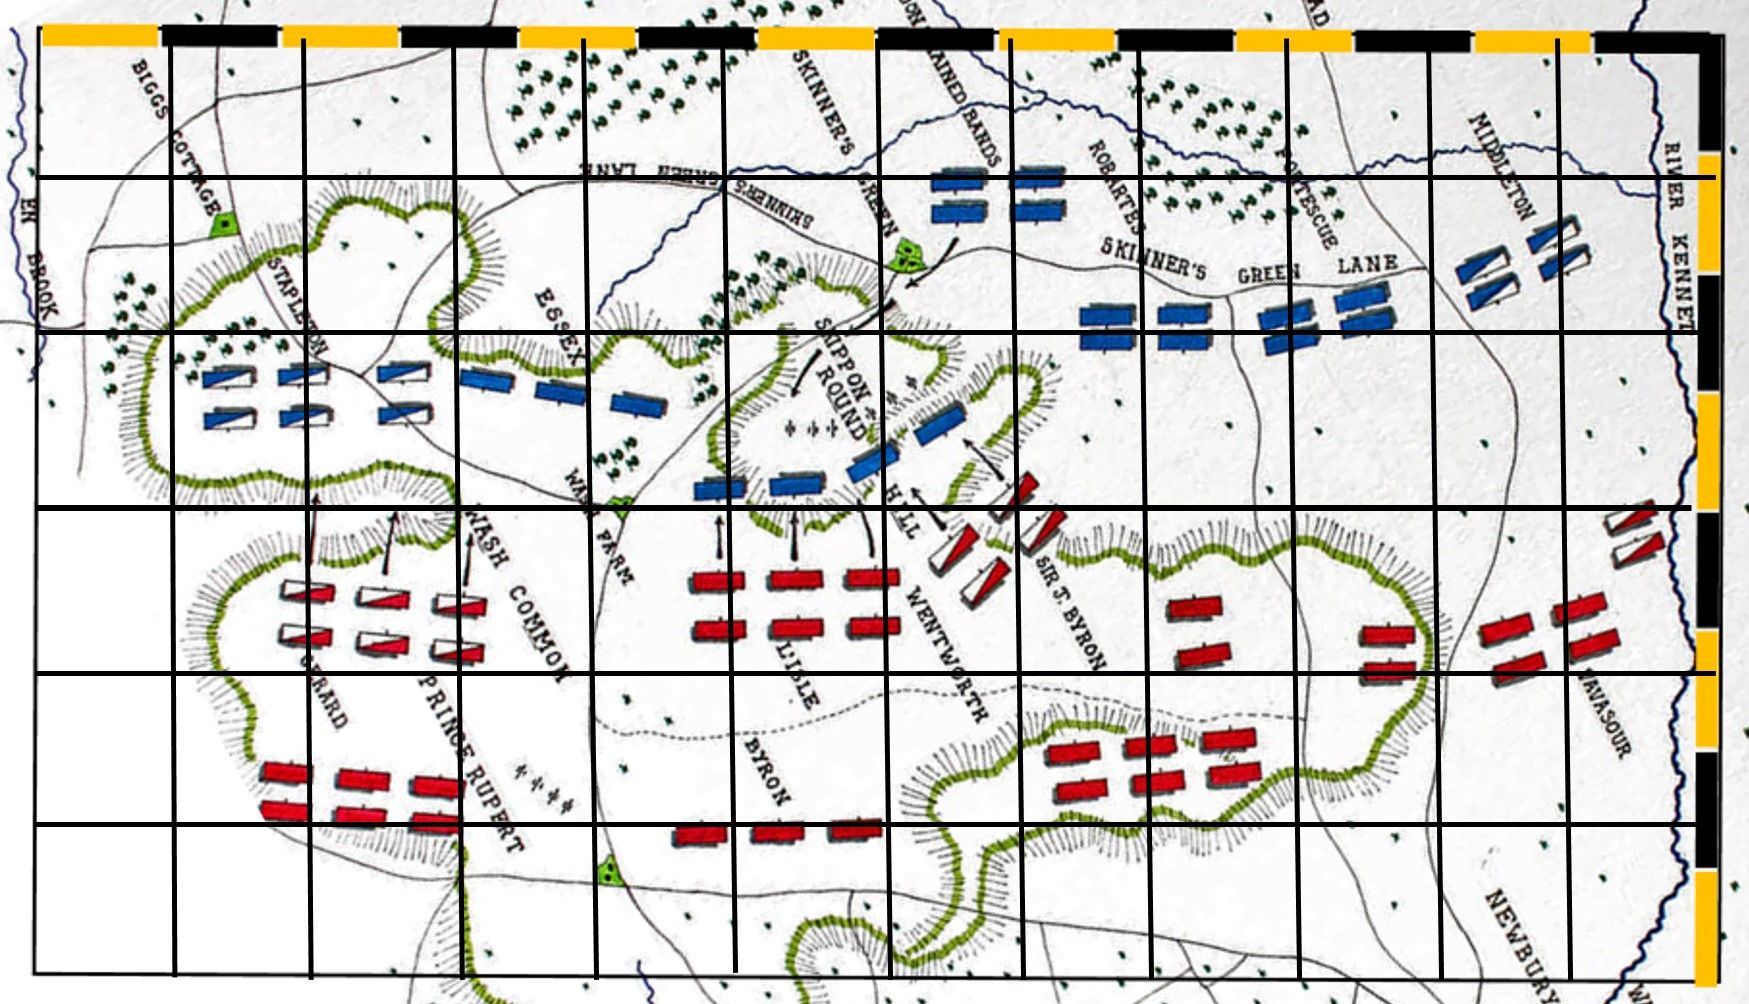
On the map below I have outlined the scale using the black and yellow boxes to define quarter mile sections. 


The map was then rotated and subdivided into foot squares  as illustrated below


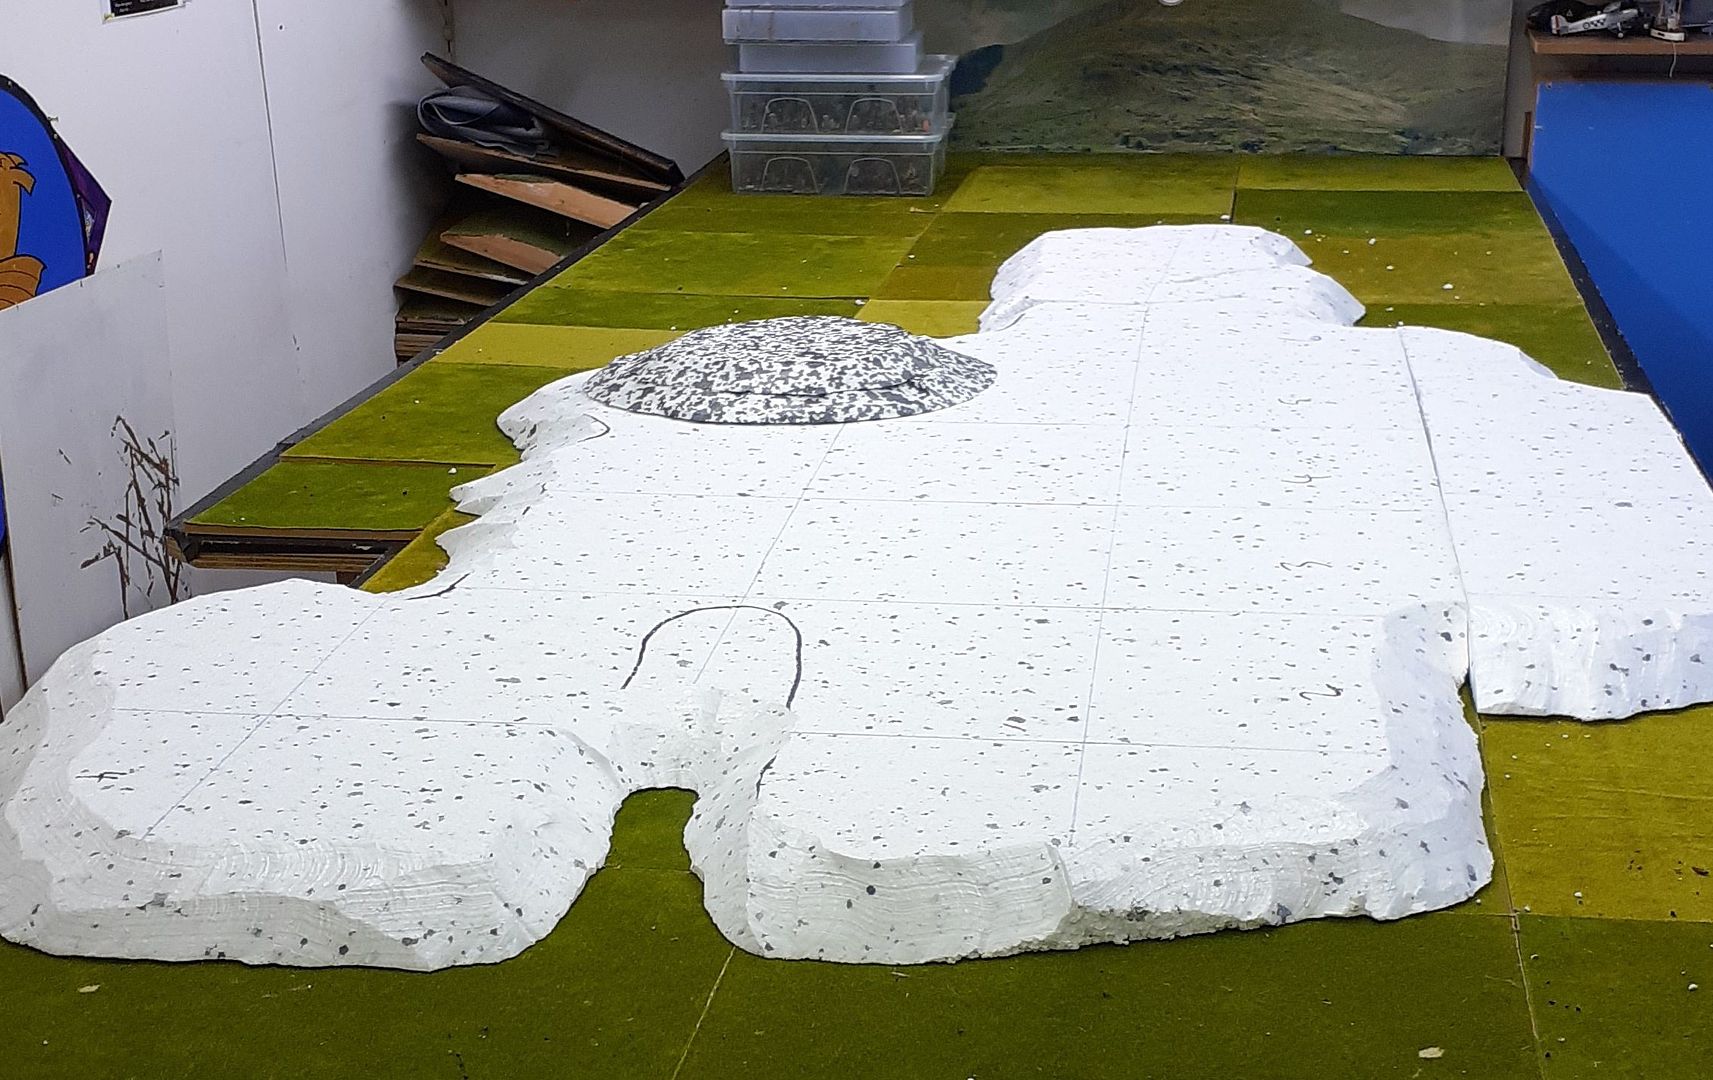
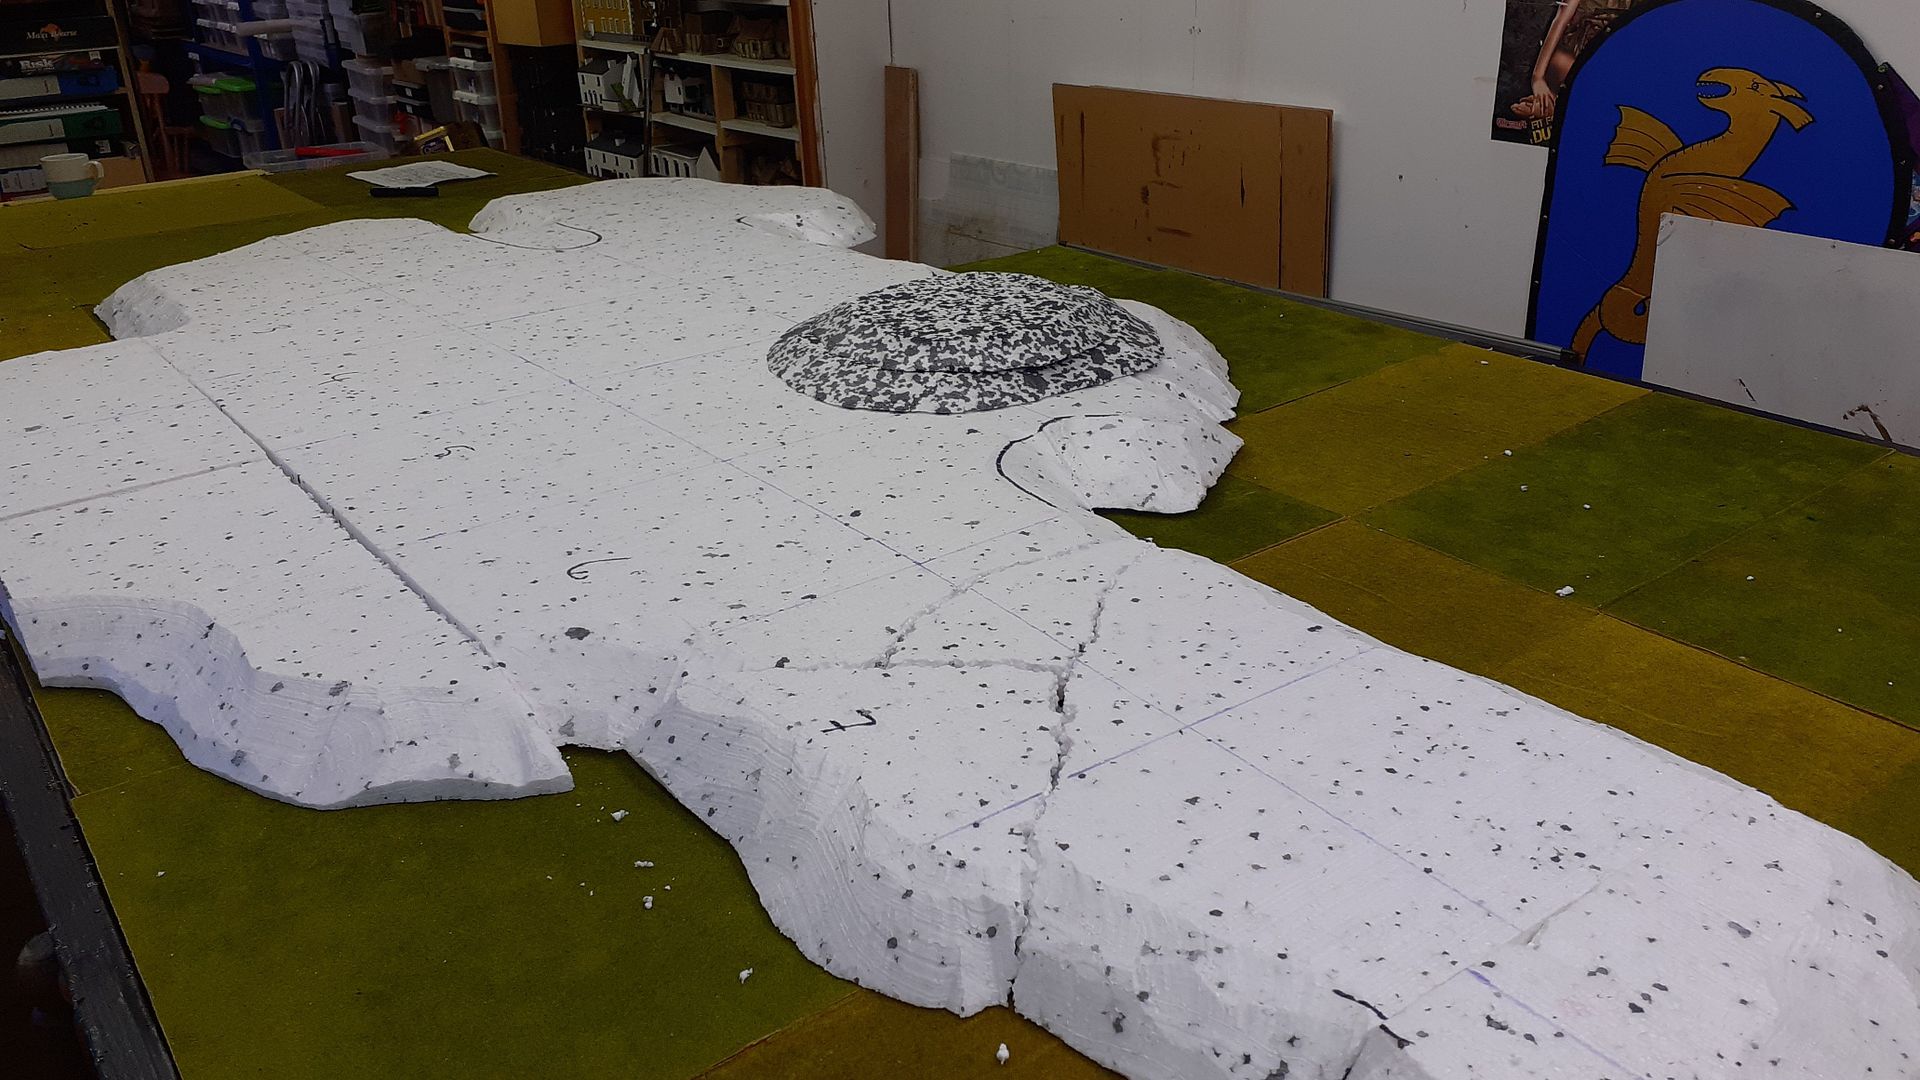
Using these grids as a template I was able to transfer the contours (green lines) of the battlefield onto a large slab of polystyrene (8ft x 4ft). Then using a hot wire foam cutter the topgraphy of the battlefield starts to take shape.


The raised hill area in the top left denotes Round hill - the highest point on wash common where the bulk of the fighting took place.


In the picture above you can just make out the gridlines. Unfortunately the 8ft slab was not quite deep enough so off cuts were used to finish off the raised area.

This raised battlefield will eventually be covered in the green throws - only then will I dress the battlefield. Experience has shown us that once the terrain and troops have been added the slopes will become much more evident.


The North and south flanks of the battlefields will be defined as the river Kennet and the En brook. The Stream running south north along the rear of the Parliamentarian force will be fordable.
To the North along the banks of the Kennet will be an area enclosed by fields – see map below


Other features such as the known Farms will feature and will count as small built up areas.
All hedgerows and woods will count as light cover.

Elevation Scale

The height (according to topography maps) of Wash common rises to around 400ft (peaks at 433ft) and this drops away to an altitude of 266ft at the rivers Kennet and Enborne. That is an approximate elevation of around 150ft that needs to be reflected at ground scale. Given the distance from the low ground to the highpoint on Wash common is about 1km we are seeing a gradual rise of about 50yds over this distance – approx. 5m every 100m (a ratio of 1:20). For this to be reflected accurately on the battlefield table the peak height of the wash common will need to be about 1 inch high.

This on the face of it doesn’t appear to be particulary daunting so the higher ground around the common will be about 2” (5cm) high – perfect for that slab of polystyrene !

Ground Scale - Ranges & Movement

As mentioned the battle field will be 4 miles wide and 2 miles deep.

Using the measurements of the table we can calculate that ground scale will be 3ft to one mile on the table. Or the equivalent of 1” = 50 yards

Given that the Pike and Shotte rules allow musket fire out to 18” (equivalent of 900 yards for this game) this range scale does not work.

I have therefore decided to reduce all movement and ranges by 33%. This does mean that troops won’t be firing at one another until they are 12” away from one another and that close range will now be reduced to 4.

To reflect the ranges I have decided that we will adopt the following for all musket fire.
Range

Close – up to 4” (200yds)
3+ to hit
Effective – up to 8” (400yds)
4+ to hit
Long – up to 12”(600yds)
5+ to hit

Please note that these ranges are still somewhat longer than the historic ranges and probably afford  greater accuracy of these weapons than due but to shorten them any further would lengthen the time to play the game considerably.

A note on artillery ranges
A Demi Culverin (medium Cannon) had an effective range of 1800feet/600 yards (source: http://www.horsmonden.co.uk/history/furnace/types-of-cannon/

Using the effective range of the Demi Culverin (medium cannon) as a guide this would give it a game range of 12”. The effective range in the rules is 18” so again all Artillery ranges will be subject to the 33% reduction
All ranges will feature on the players aids that I will provide on the day.


Movement

I have also played around with the movement rates of troops for the game

To keep things simple units can adopt one of two formations, they are either formed in battle line or in column of march.

The latter will afford these units significant benefits in speed and the +2 command modifier. However changing formation within a move is NO longer a viable option.
A unit commanded to change formation must spend its entire move to do so regardless of how many orders they succeed.

Unit
In Battle Formation
In Column
Infantry
4”
6”
Cavalry
8”
12”
Artillery
4”
6”

Reports from the battle suggest that reserves were fed onto the battlefield by the numerous roads and tracks in the area. Troops using roads must be in Column formation and if on a road/track they will receive a further +1 command roll.

The Hedgerows on the battlefield were defined as relatively tall and dense. Traversing a hedgeline will take a complete move.
Hedgerows themselves will afford the defenders a +1 morale sale for light cover and negate any charge bonus for attacking troops.

Hills/Slopes offer no cover bonus but troops attacking uphill will lose any charge bonus

Initiative:

Initiative on the table will be maintained at 6” for all troop types

In part 2 I'll share the orders of the battle and how these were created.

Part 2 can be found here